Lab 6: Process Resume Documents and Create Contacts with MuleSoft for Flow: IDP
Overview
In this lab you’ll learn how to use MuleSoft for Flow: IDP directly within Salesforce to process documents and automate business processes. You’ll create a Document Processing Configuration that extracts data from resumes, then build a Salesforce Flow that uses this extracted information to automatically create a new Contact record.
-
This represents the next generation of intelligent document processing, bringing IDP capabilities natively into the Salesforce platform without requiring RPA infrastructure or Anypoint Platform.
-
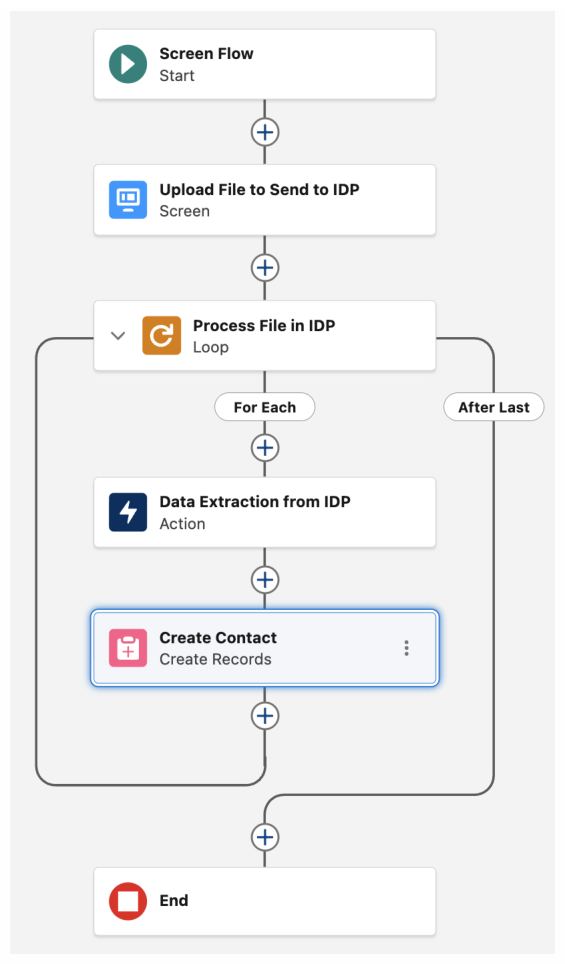
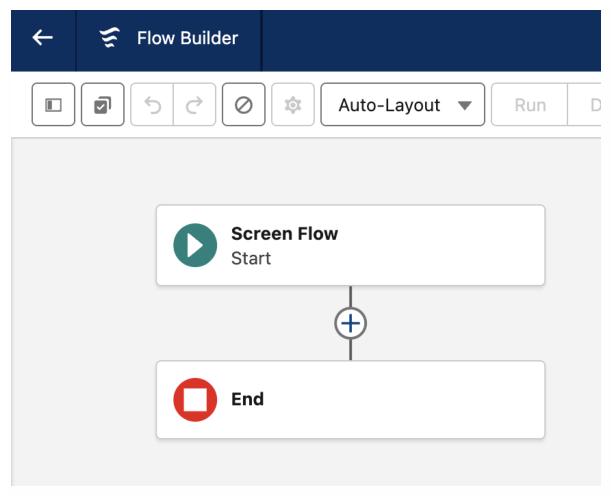
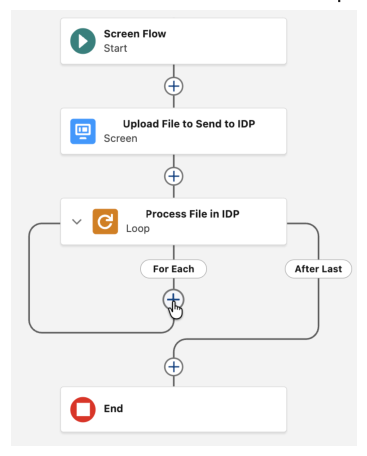
As part of the exercise, you’ll leverage auto-extraction to generate a schema from a sample resume, configure specific extraction fields, and build an automated flow. Following you see the completed flow you’ll be working on:
Prerequisites
-
Access to a Salesforce org with the Automation App and MuleSoft for Flow: IDP enabled
-
When MuleSoft for Flow: IDP is provisioned properly, a new "Document Processing" tab becomes available in the Automation app and an "Extract Data from Document" action will become available inside Flow Builder
-
-
Basic familiarity with Salesforce Flow Builder
-
Sample resumes for testing (PDF, PNG, JPG, or JPEG format)
-
Sample resumes will be provided
-
Feel free to use other resumes, just ensure they include a First Name, Last Name, and Phone Number
-
Important: Shared Org Naming Convention
Since a single Salesforce org is being shared for this workshop, you will use unique names when creating Flows, Document Configurations, and API Names to avoid conflicts (as indicated in the step by step instructions below).
-
Format:
<your initials>_API_Nameand<your initials>_Label_Name -
Why this matters: Salesforce won’t allow duplicate Flows Names, Document Configuration Names, and API Names in the same org. If you try to save a Flow with an API Name that already exists, you’ll get an error. Using your initials prevents save errors and helps you identify your own work.
-
Example:
-
API Name:
RJ_Extract_Resume_Data -
Label:
RJ_Extract Resume Data
-
-
Note: Once your configurations are working correctly, you can always go back and clean up the labels to make them more readable if desired.
Step 1: Navigate to Document Processing
Log on to your Salesforce org
-
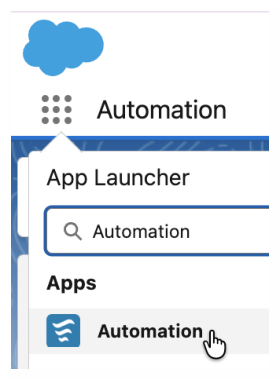
Click the App Launcher icon (grid icon with 9 dots) in the top left corner
-
In the search box, type Automation
-
Click on Automation from the Apps section
-
Once the Automation app loads, select the *Document Processing tab in the navigation bar

Step 2: Create a New Document Processing Configuration
Create a new Document Processing Configuration and upload a sample resume
-
Click the blue
New Document Processing Configurationbutton in the top right -
Select
Upload Fileson the left side of the screen and navigate to the resume you want to process -
Click Open
-
Wait for the upload to complete
-
Click Done
Step 3: Use Auto-Extraction to Generate Schema
This is where MuleSoft for Flow: IDP showcases its AI capabilities by automatically analyzing the document structure.
-
Select Using Auto-Extraction (Note - this option only activates if you completed Step 2 and uploaded a document already)

-
Click Next
-
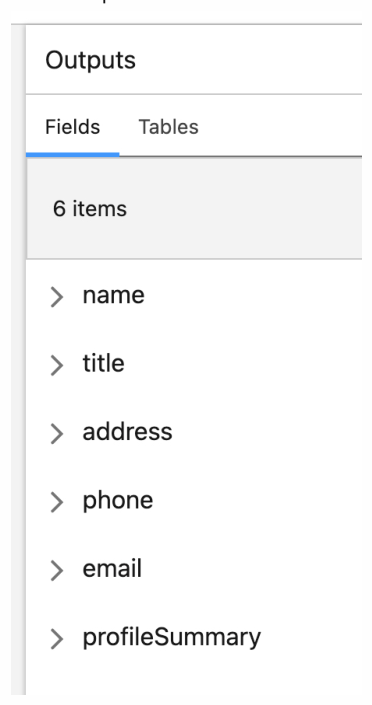
Wait while the system analyzes your resume and identifies potential fields
-
Review the auto-generated fields that appear
-
For example - these fields were auto-generated, not manually created
Step 4: Add Additional Fields
Now you’ll specifically add and configure the 3 new Fields: First Name, Last Name, and Phone Number.
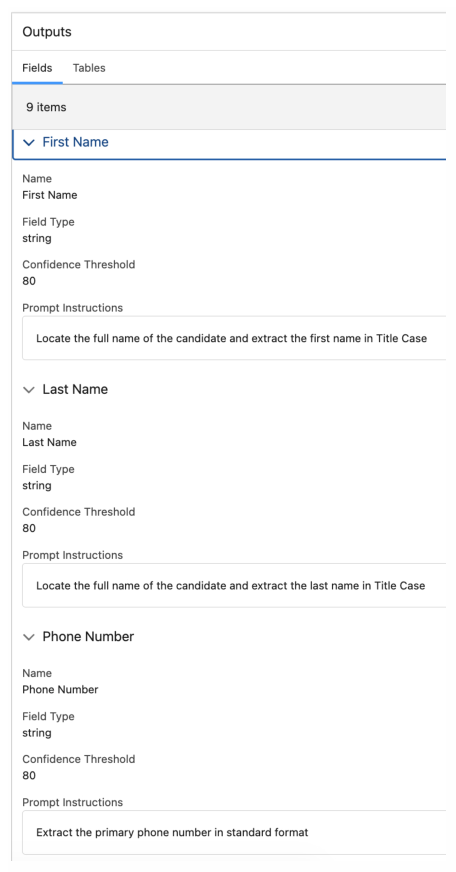
Add First Name
-
Select
+ Add Fieldand then enter the following details:-
Name: First Name
-
Field Type: string (already selected)
-
Confidence Threshold: 80
-
Prompt Instructions: Locate the full name of the candidate and extract the first name in Title Case
-
-
Click Add
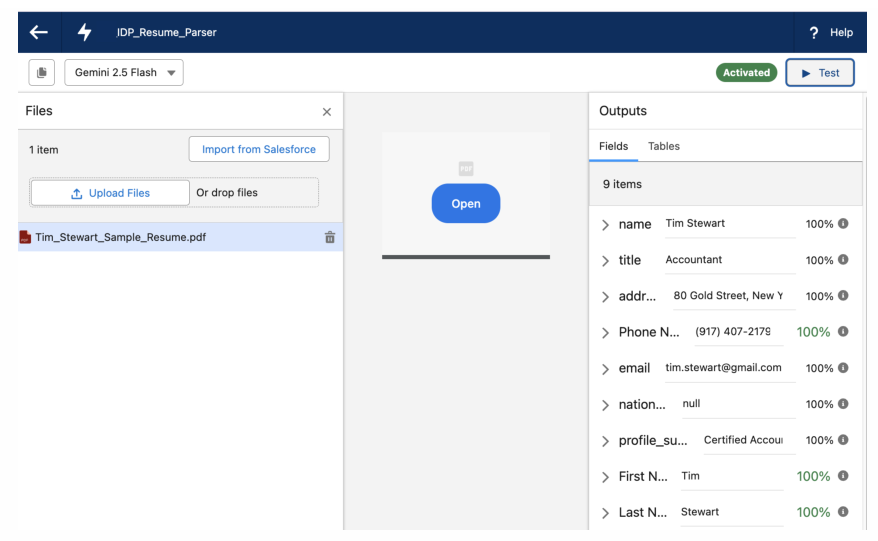
Step 5: Test, Save and Activate the Document Processing Configuration
-
Click Test and wait a few seconds
-
Review the extracted fields that appear
-
Optional: Add or modify fields (except for the 3 required fields you just created)
-
Optional: Upload additional resumes and review the results
-
-
Select Save
-
Name:
<your initials>_IDP Resume Parser -
API Name:
<your initials>_IDP_Resume_Parser -
Description (optional): Extracts data from uploaded resumes
-
-
Click Activate
-
Congrats! Your new Document Configuration is now complete
-
-
Please Note! It may take a few minutes for this new document processing configuration to show up in Salesforce flow. A logoff/login may be necessary in the org.
-
Use the Back Arrow on the top left to exit this area and go back to the Automation app
Step 6: Create a New Salesforce Screen Flow
Now you’ll build a new Screen Flow that uses your Document Processing Configuration
-
Select the Flows Tab in the Automation App
-
Click the New button on the top right
-
Select Screen Flow (in the Frequently Used section)
-
You are now in the Flow Builder
-
On the Flow canvas, the Flow automatically starts with a Screen Flow Start element
-
-
Click the + icon below the Start element
-
Select Screen
-
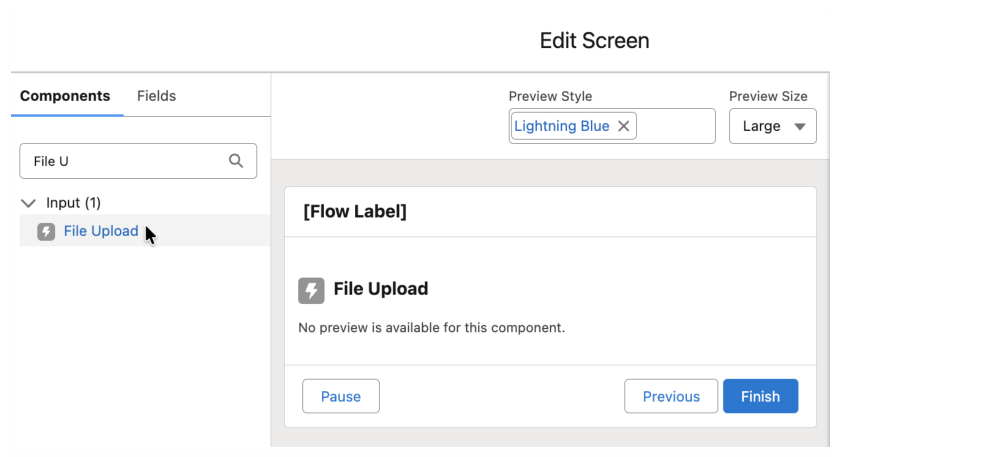
Configure the Screen Properties on the right side:
-
Label:
<your initials>_Upload File to Send to IDP -
API Name:
<your initials>_Upload_File_to_Send_to_IDP(auto-populated)
-
-
On the left side, search for and select the Component called File Upload which adds it to the screen canvas
-
On the right side, configure the File Upload properties:
-
API Name:
<your initials>_Upload_Resume(Type this in, don’t use the auto-suggest option) -
Label:
<your initials>_Upload Resume(Type this in, don’t use the auto-suggest option)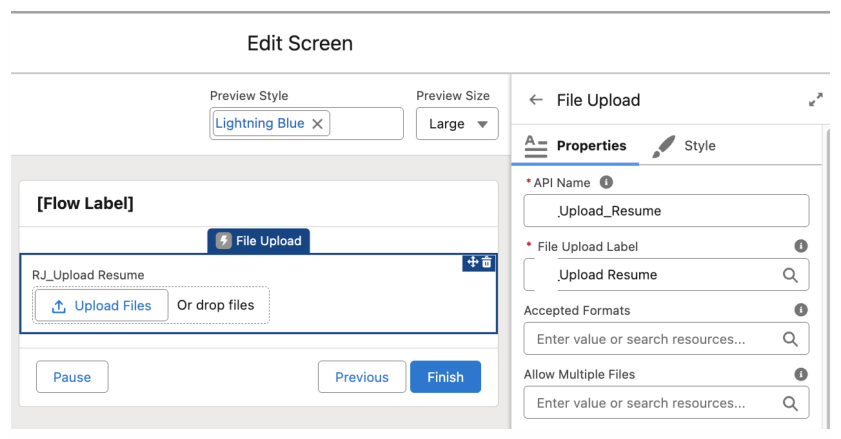
-
-
Click Done
Step 7: Add a Loop to Process Files
The File Upload component returns a collection of files. Even though users will only upload one resume at a time, we need a Loop to access the individual file’s Content Document ID.
-
Click the + icon after the Upload File screen
-
Search for and Select Loop
-
Configure the Loop element:
-
Label:
<your initials>_Process File in IDP -
API Name:
<your initials>_Process_File_in_IDP(auto-populated) -
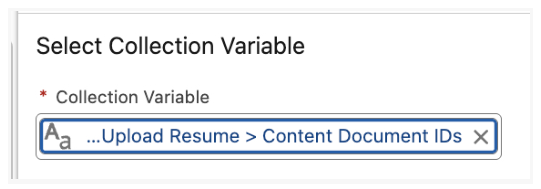
Collection Variable: Click through these 3 fields to navigate to select Content Document IDs:
-
Screen:
<your initials>_Upload File to Send to IDP -
Screen Components:
<your initials>_File_Upload -
Outputs: Content Document IDs
-
-
-
Click the X on the top right to close the Loop properties
Step 8: Add the IDP Action
Now add the IDP action inside the Loop.
-
Click the + icon in the For Each path of the Loop
-
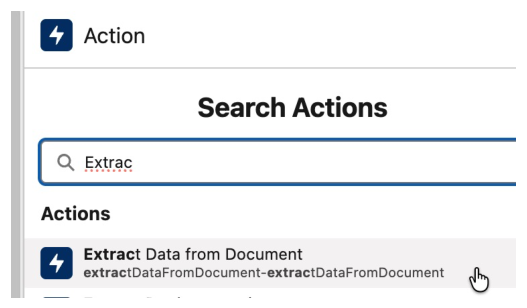
Select Action
-
In the search box, type: Extract Data from Document
-
Select Extract Data from Document from the search results
-
Configure the action:
-
Label:
<your initials>_Data Extraction from IDP -
API Name:
<your initials>_Data_Extraction_from_IDP(auto-populated) -
Description: (optional, leave blank)
-
-
In the Set Input Values for the Selected Action section:
-
Add a Content Document ID: Click in the field and you’ll see Quick Resources, select the Current Item from Loop… option
-
Document Processing Configuration: Select
<your_initials>_IDP_Resume_Parser
-
-
Click the X on the top right to close these properties
Step 9: Add a Create Records Element
Still inside the Loop, add the element to create a Contact record from the extracted data.
-
Click the + icon after the Data Extraction from IDP action (still in the For Each path)
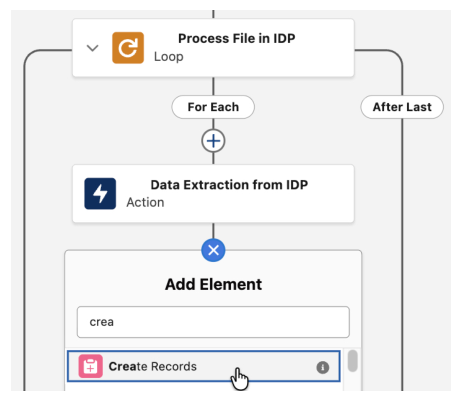
-
Select Create Records
-
Configure the Create Records element:
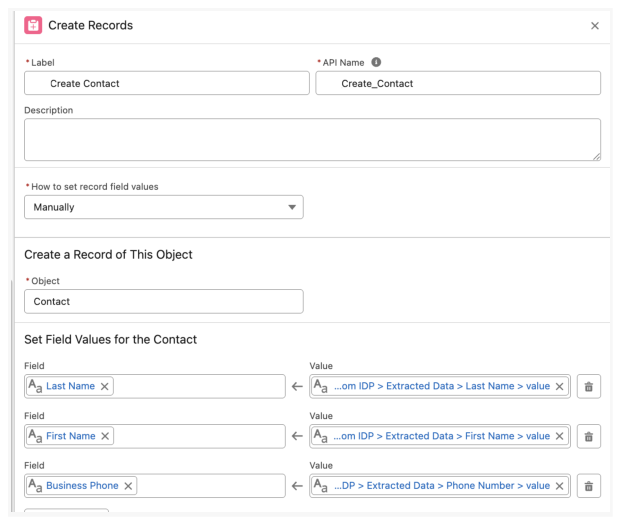
-
Label:
<your initials>_Create Contact -
API Name:
<your initials>_Create_Contact(auto-populated) -
How to set record field values: Select Manually from the dropdown
-
Object: Select Contact
-
Set Field Values for the Contact: (You will map the 3 fields that we know exist in your IDP Extracted data)
-
Last Name
-
Field: Select Last Name
-
Value: Drill down to get to the appropriate selections
-
Action Outputs from
<your initials>_Data_Extraction_from_IDP -
Outputs: Extracted Data
-
Properties: Last Name
-
Properties: value
-
-
-
First Name
-
Field: Select First Name
-
Value: Select
-
Action Outputs from
<your initials>_Data_Extraction_from_IDP -
Outputs: Extracted Data
-
Properties: First Name
-
Properties: value
-
-
-
Business Phone
-
Field: Select Business Phone
-
Value: Select
-
Action Outputs from
<your initials>_Data_Extraction_from_IDP -
Outputs: Extracted Data
-
Properties: Phone Number
-
Properties: value
-
-
-
-
-
Click the X on the top right to close these properties
Step 10: Save and Test the Flow
|
Since we’re using shared files, your Contact might already be in the system! Just give it a quick look and delete out any existing Contact records for your resume person before you run your test. |
-
Click the Save button in the top right
-
Fill in the flow details:
-
Flow Label:
<your initials>_IDP Resume to Contact -
Flow API Name:
<your initials>_IDP Resume to Contact(auto-populated) -
Description: (Optional) Screen Flow that allows users to upload resumes and automatically create a Contact records using MuleSoft for Flow: IDP
-
-
Click Save
-
Click Debug to test your Flow immediately
-
Click Run
-
Select Upload Files and select a resume from your computer; select Done once it uploads
-
Click Next (right side of screen)
-
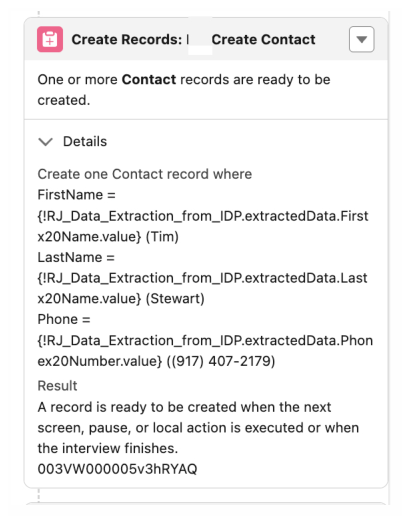
It will take a few seconds to run. On the left side you’ll see the Debug Flow Interview details, and you can open the details to see the Create Records details.
-
Select the Back Arrow to exit the Flow builder and note that your Flow has:
-
Processed the uploaded file through your Document Processing Configuration
-
Extracted the data (First Name, Last Name, Phone, Email, etc.)
-
Created a new Contact record
-
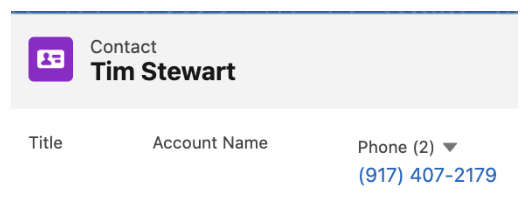
Step 11: Verify the Contact was Created
-
Navigate to Contacts (use the App Launcher or navigation menu)
-
Look for the newly created Contact with the name from your processed resume
-
Open the Contact record and verify:
-
Salesforce will automatically create the Full Name from the First Name and Last Name fields
-
Phone is populated with the phone number from the resume
-
-
Please delete the contact so that the next user can test with the same sample file(s)
Congratulations!
In this lab, you:
-
Created a Document Processing Configuration using MuleSoft for Flow: IDP
-
Uploaded a sample resume and leveraged auto-extraction to automatically generate an extraction schema
-
Configured specific extraction fields (First Name, Last Name, Phone Number) with custom prompt instructions
-
Tested document processing and validated extraction quality
-
Built a Screen Flow that allows users to upload resumes on-demand
-
Used a Loop to process uploaded files through IDP
-
Added an Action to extract data using your Document Processing Configuration
-
Created a Contact record automatically with the extracted data