Lab 4: Create Composer Flow to Sync Salesforce with Financial System
Overview:
So far we have covered the new Automation Process, reusing one of the existing activities, and publishing it as an API to be invoked by MuleSoft Composer.
On this Lab we cover the definition of the MuleSoft Composer Integration flow:
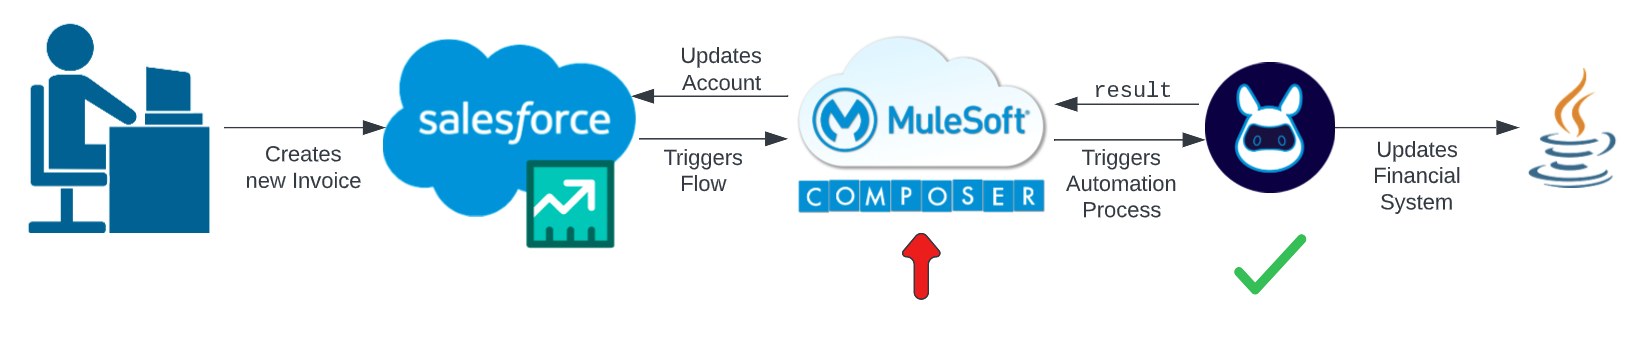
As noted in the Module Overview, we first need to get triggered by a new InvoiceSummary Salesforce object:
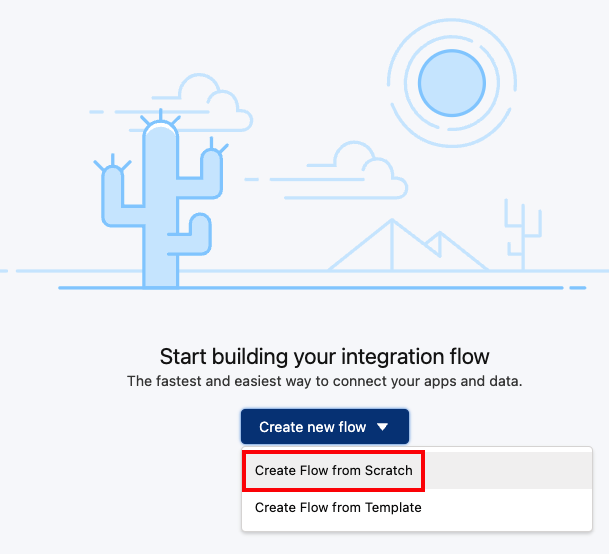
Step 1: Create a New Composer Flow
-
Login into MuleSoft Composer and select the button to create a new Flow from Scratch.
-
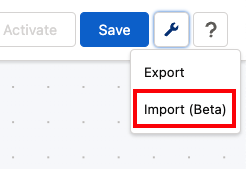
We have created for you part of the Composer flow that can be imported.
On the top right, click on the tool icon and click on the Import (Beta) button:
-
Load the
Learners_Repository/Student Files/Module_4_processes/flow_Module_4 - Sync Salesforce with Financial System.jsonfile -
As the imported flow makes use of a Salesforce connection and is not included in the file, you must create now such connection.
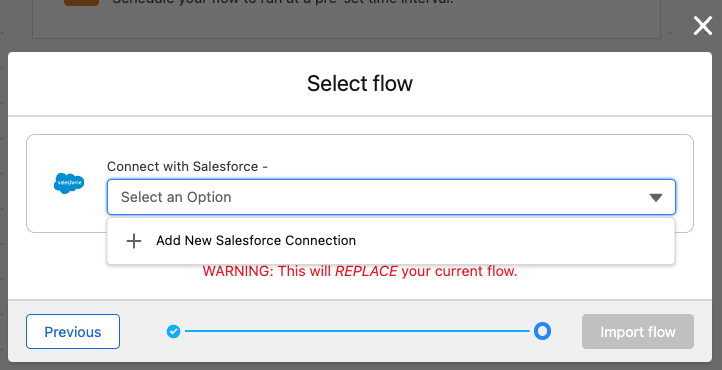
In the dropdown menu, select Add New Salesforce Connection
-
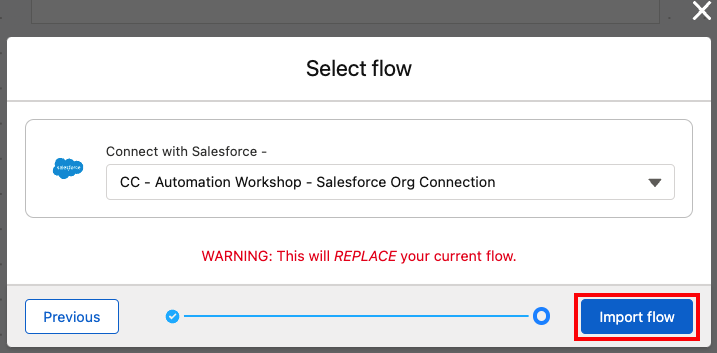
Set the name to
<your initials> - Automation Workshop - Salesforce Org Connectionand click Connect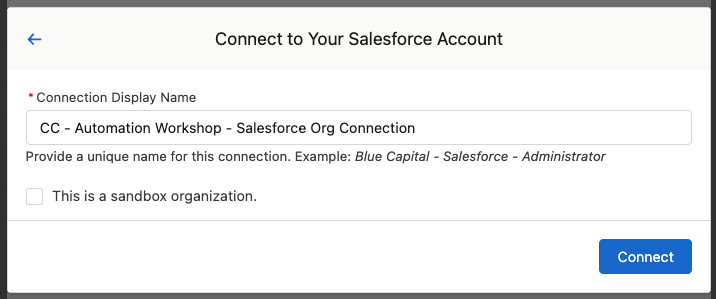
-
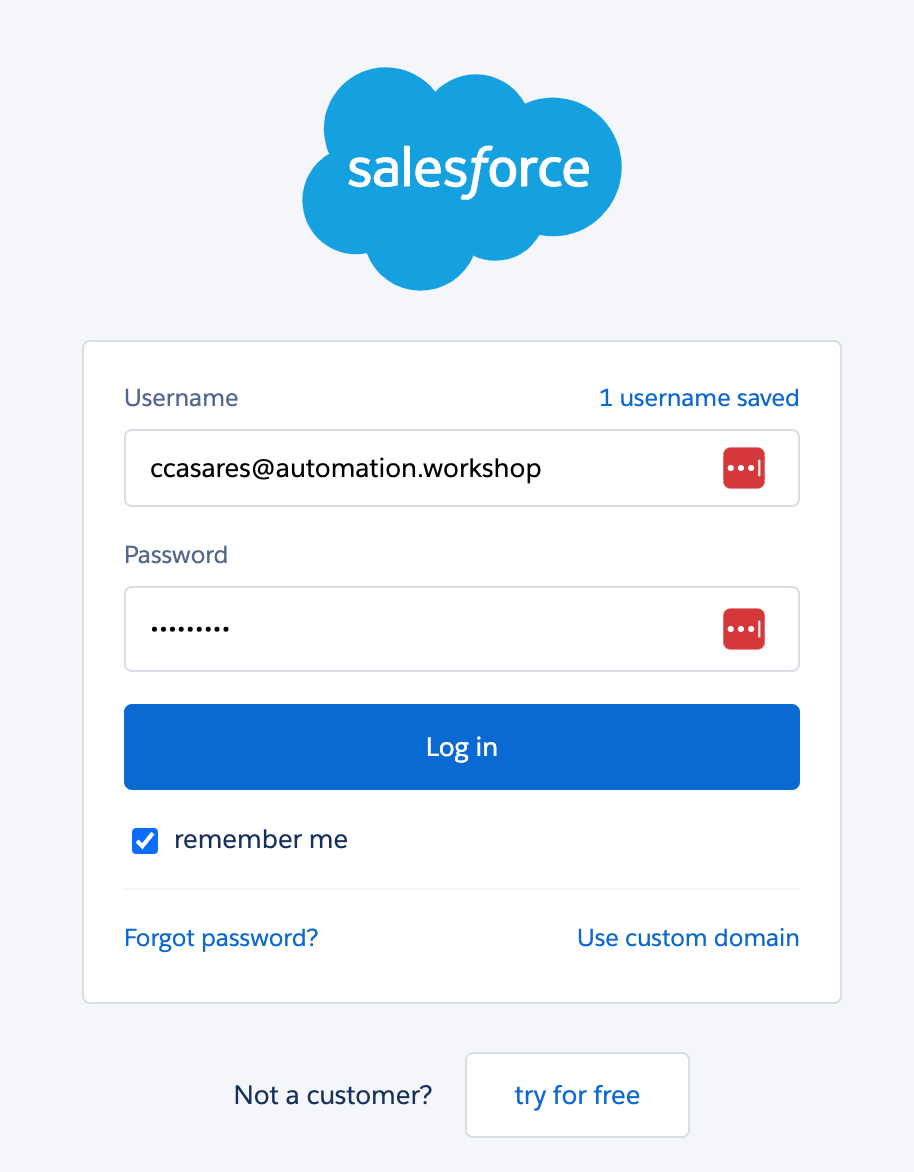
In the next window, login into the Salesforce Developer ORG with the given credentials.
-
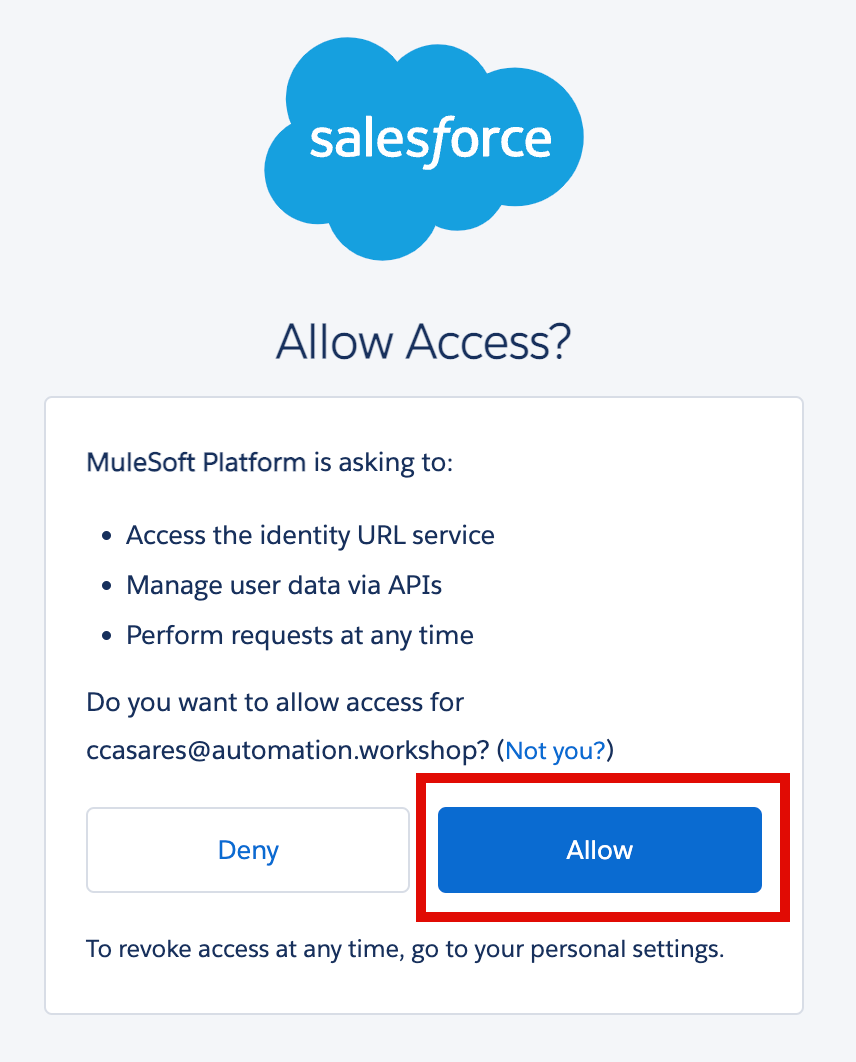
Allow access and provide required permissions.
-
Finally, click Import Flow to import the given template:
-
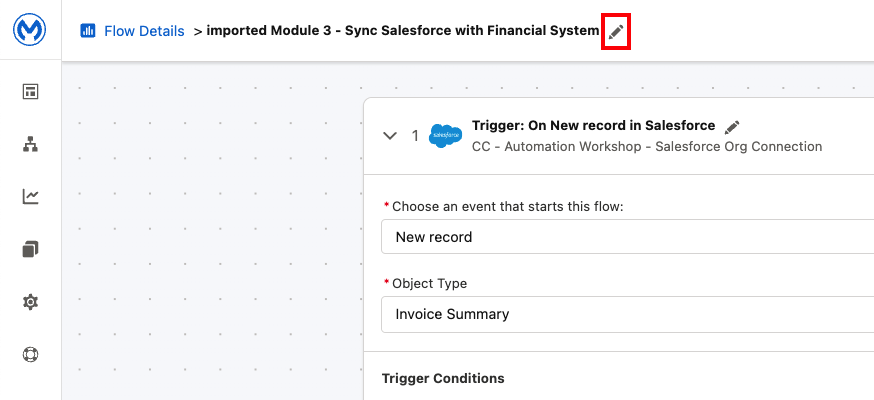
Click the pencil icon on top-left to rename the newly imported flow.
-
Change the name flow to from
imported Module 4 - Sync Salesforce with Financial Systemto
<your initials> - Sync Salesforce with Financial System
-
Click on Save button (located on the top-right)

Step 2: Update the Triggering System Event
-
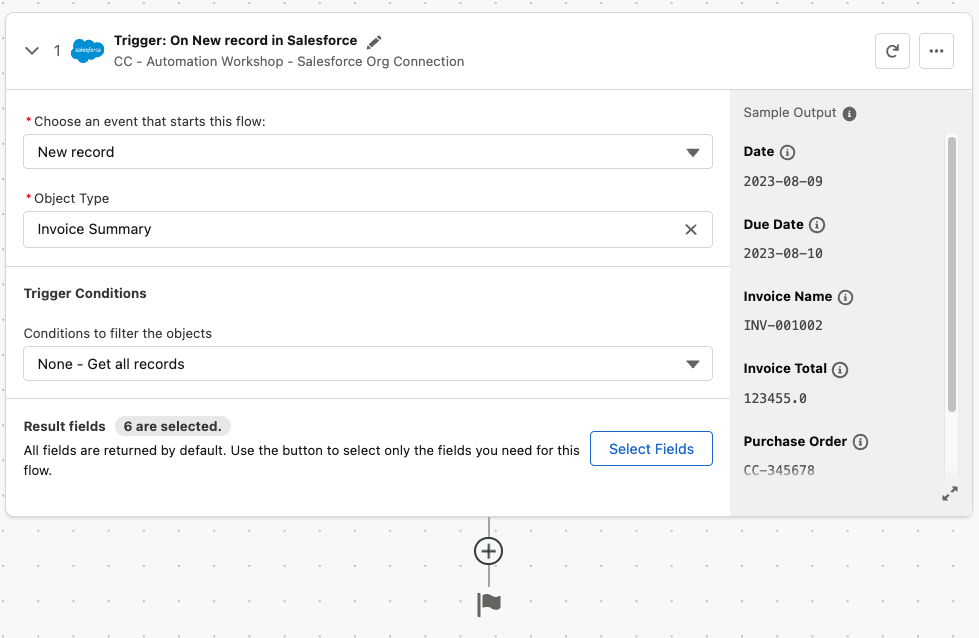
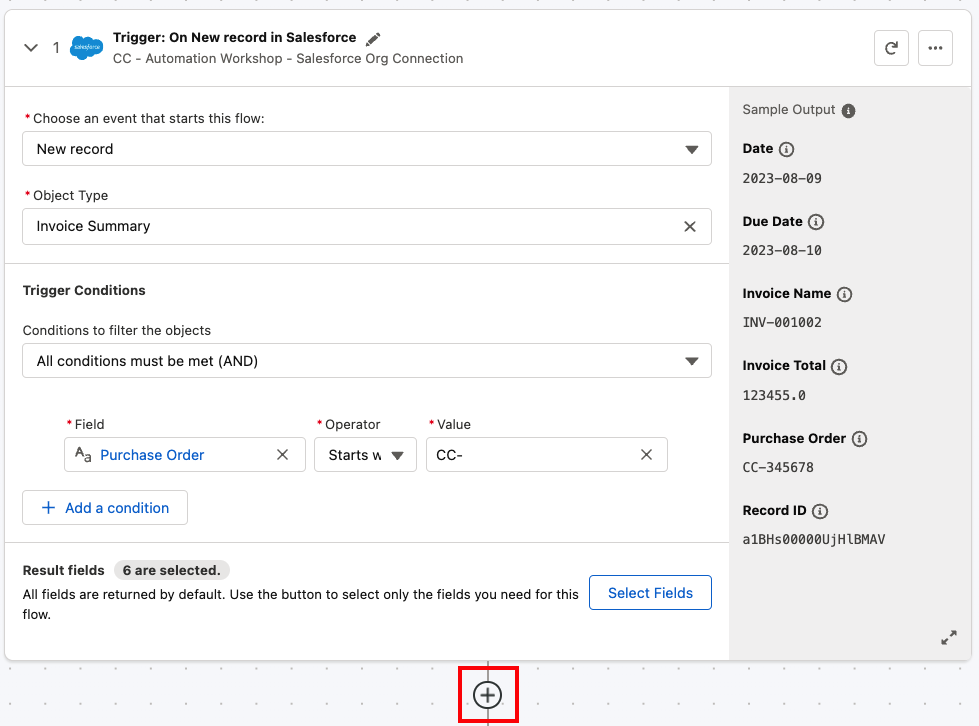
The imported flow already provides the trigger step, that is, the event handler that will make the whole Composer flow to run.
As you can see, this trigger event is monitoring in your configured Salesforce organization for New Records of type Invoice Summary:
-
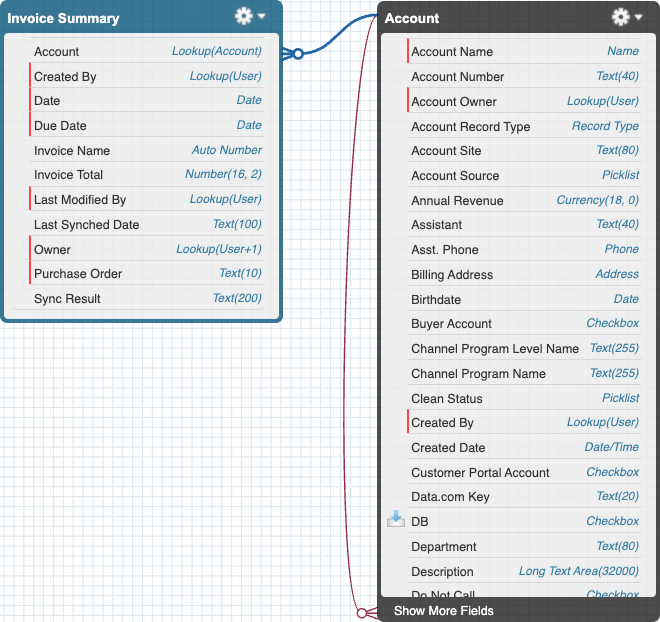
An incoming event may contain as many Salesforce object attributes as needed.
Click the Select Fields button to check which attributes we have selected and will be part of the event payload:
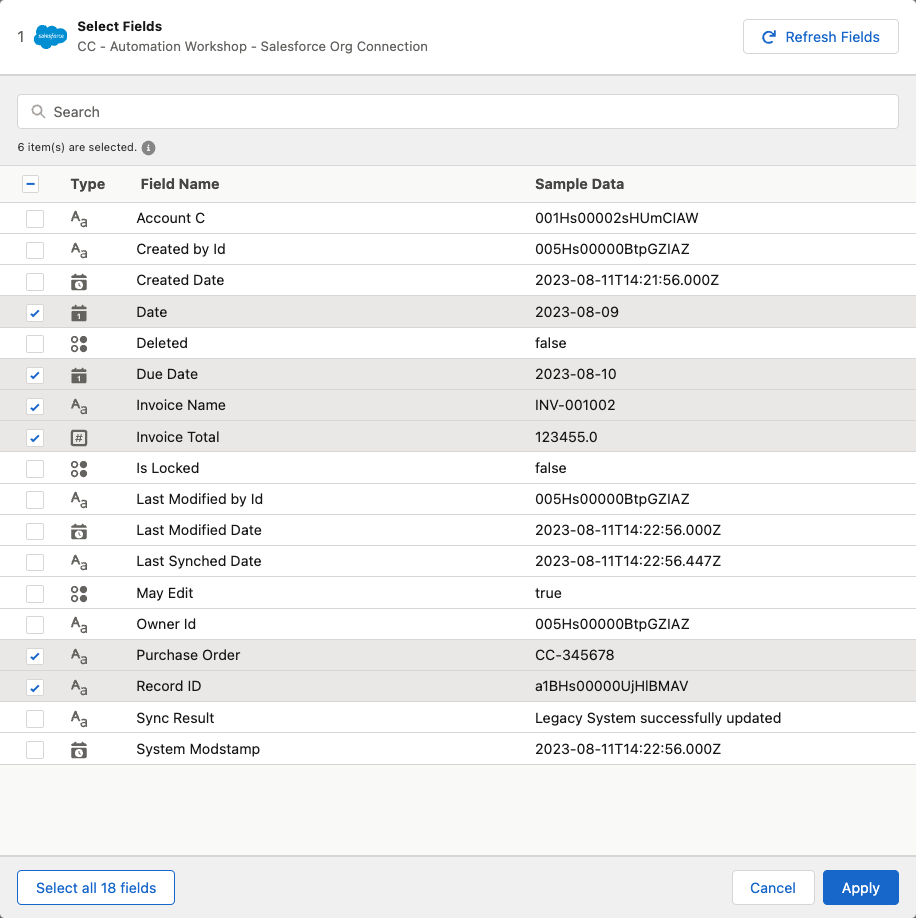
Click Cancel to continue.
-
As you will be using a shared Salesforce organization, it is important to establish a Trigger Condition so that other’s invoices do not trigger your Composer flow.
In the Trigger Conditions section, expand the filter dropdown list and select the
All conditions must be met (AND)option.Set the Field to
Purchase Order, the operator toStarts Withand the value use the following pattern:<your initials>-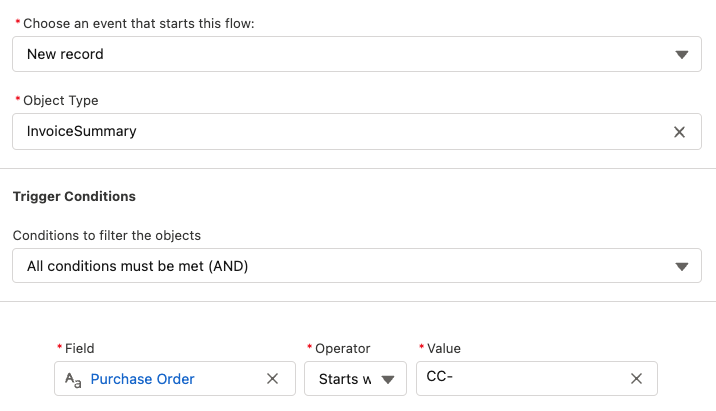
Following the above example, this process will only be triggered when you create a new InvoiceSummary object with a Purchase Order starting with
CC-such asCC-1234567
Step 3: Create Variable
-
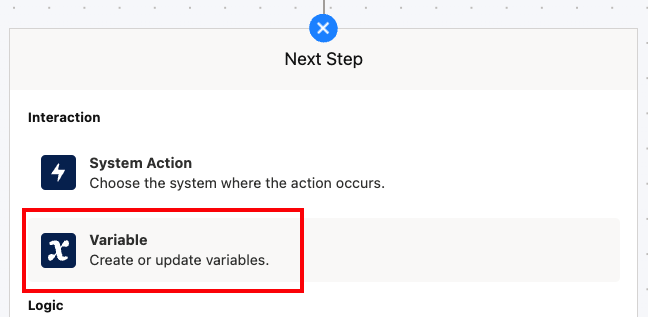
Click the plus button to add a new step just after the trigger event:
-
Select the Variable step type.
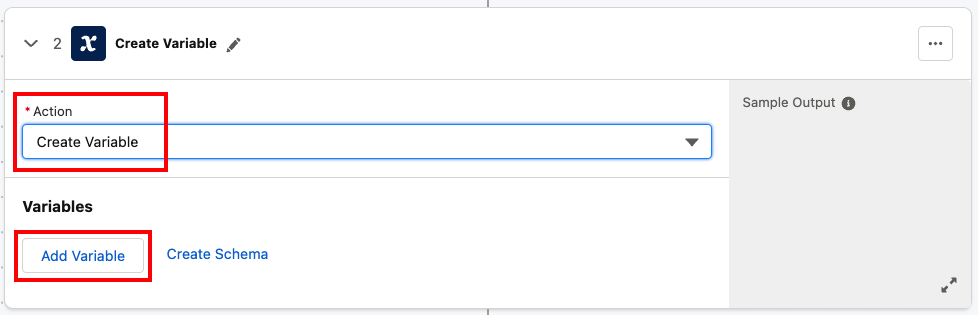
We’re going to create and use a variable that will contain the result of the execution of the Automation Process. With this step we will create such variable:
-
Select the Create Variable option and click the Add Variable button:
-
Set the variable Label to
Automation Process execution resultand Data Type toStringand click Apply
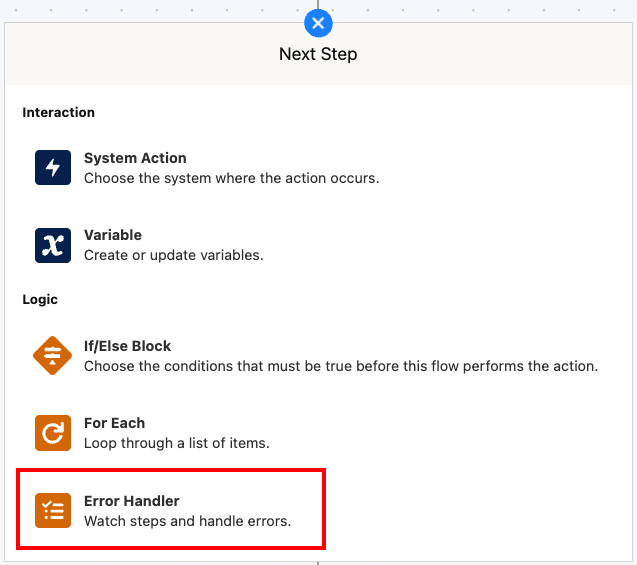
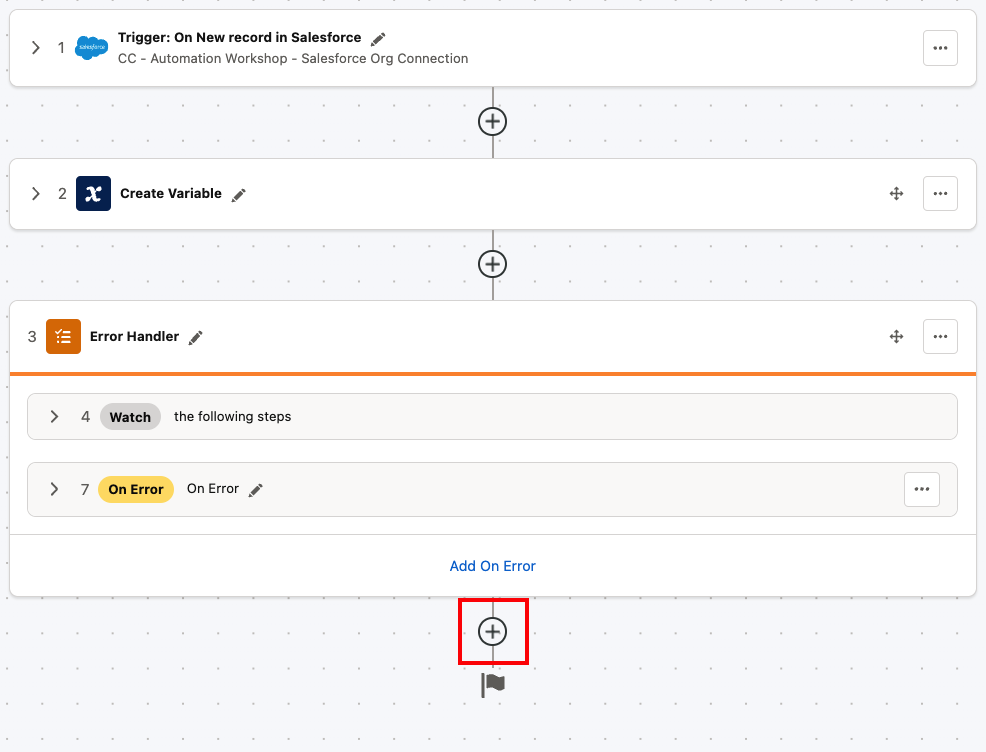
Step 4: Add and setup the Error Handler
All needed data is already part of the incoming event payload, so we’re ready to trigger our Automation Process.

However, we need to know whether the invokation of the Automation Process went well with no errors and, if so, update Salesforce accordingly.
Thus, we want to handle any error during the execution of the Automation Process
-
Click the plus button to add a new step just after the Create Variable step and select the Error Handler one:
-
In the On Error section click its own plus button to add our error handler logic:
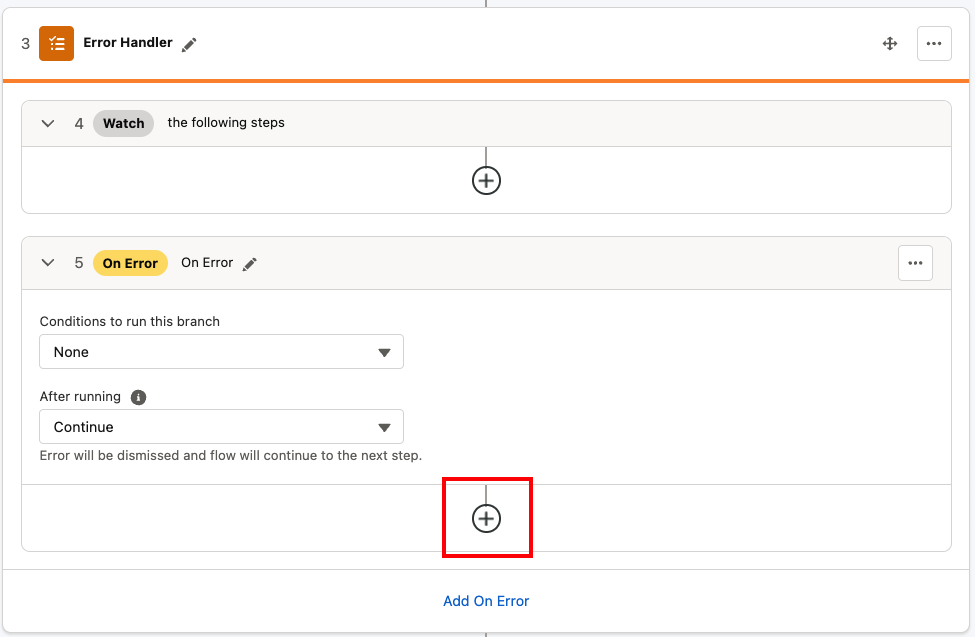
-
Select the Variable step, set the action to Update Variable and select the previously created
Automation Process execution resultone: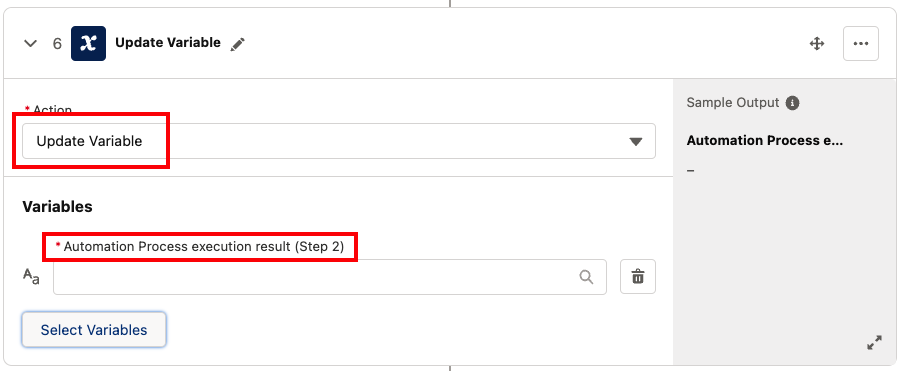
-
Click on the variable input box and select Custom Expression:
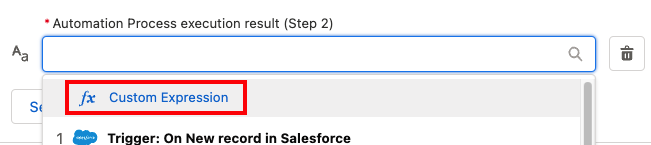
-
We want to concatenate some strings, including the error type and description.
Enter the following text in the formula input textbox:
Error executing the automation process:Then, selecting the Data tab on the left handside, locate the Error Handler section and click on the Error Type entry, type
:and click again on the Error Description entry. Click Apply to save: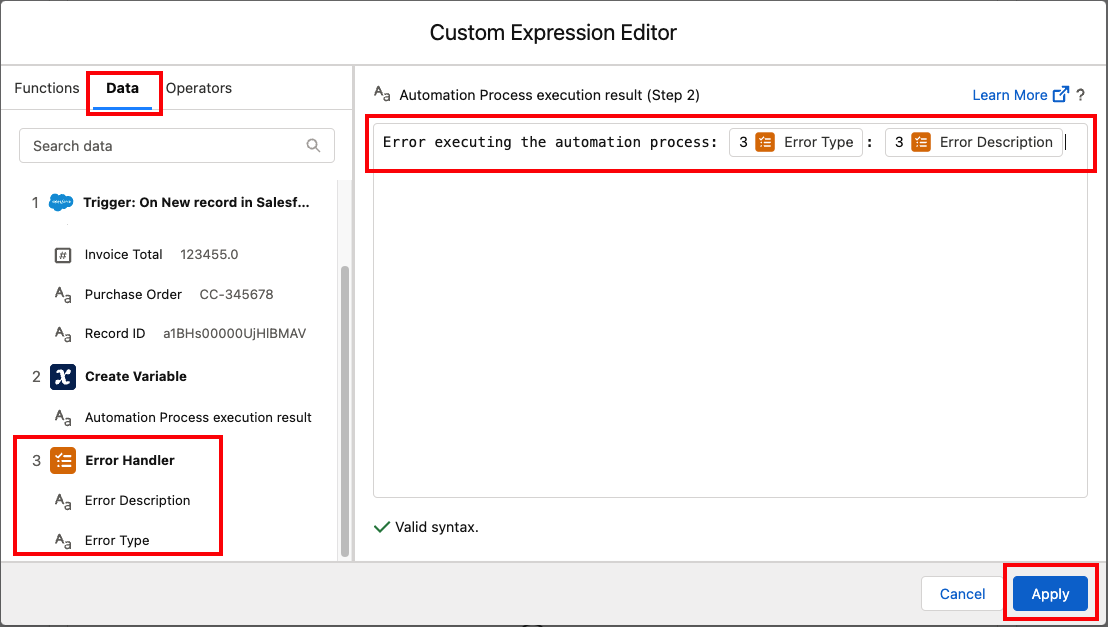
Step 5: Invoke RPA Process
-
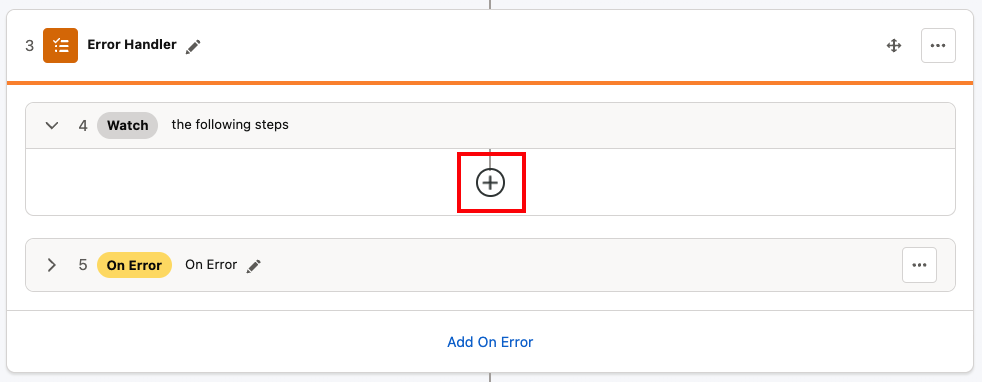
We have added the Error Handler however we haven’t yet set to which actions this error handler is monitoring.
Still inside the Error Handler step, click the plus button under the Watch section:
-
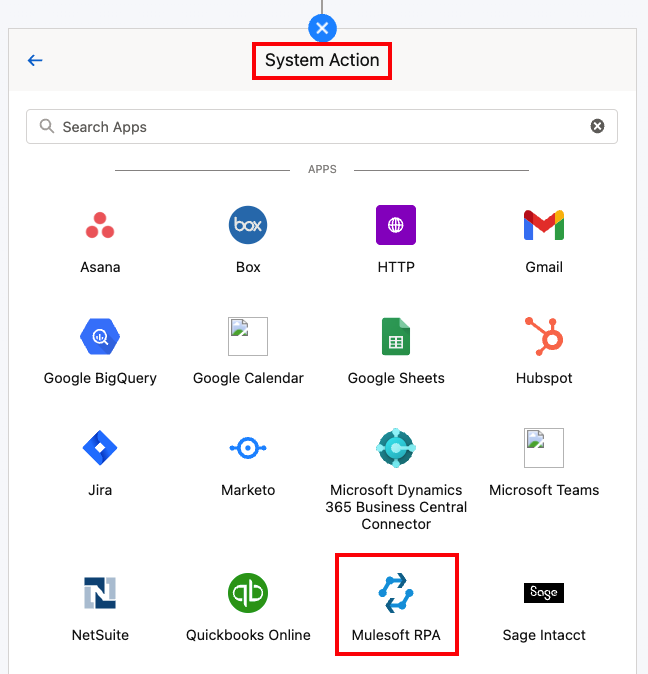
Add a new System Action step of type MuleSoft RPA:
-
Configure the MuleSoft RPA Connection as follows
Field Value Connection Display Name<your initials> - Automation Workshop - MuleSoft RPAAuthorization TypeOAuth 2.0 Client CredentialsRPA API URLhttps:// + <your tenant hostname> + /rpa/api/v2Client ID<client id>(provided by the instructor)Client Secret<client secret>(provided by the instructor)Token URLFor US instances:
https://anypoint.mulesoft.com/accounts/api/v2/oauth2/token
For EU instances:https://eu1.anypoint.mulesoft.com/accounts/api/v2/oauth2/tokenScopesRPA Invocable Process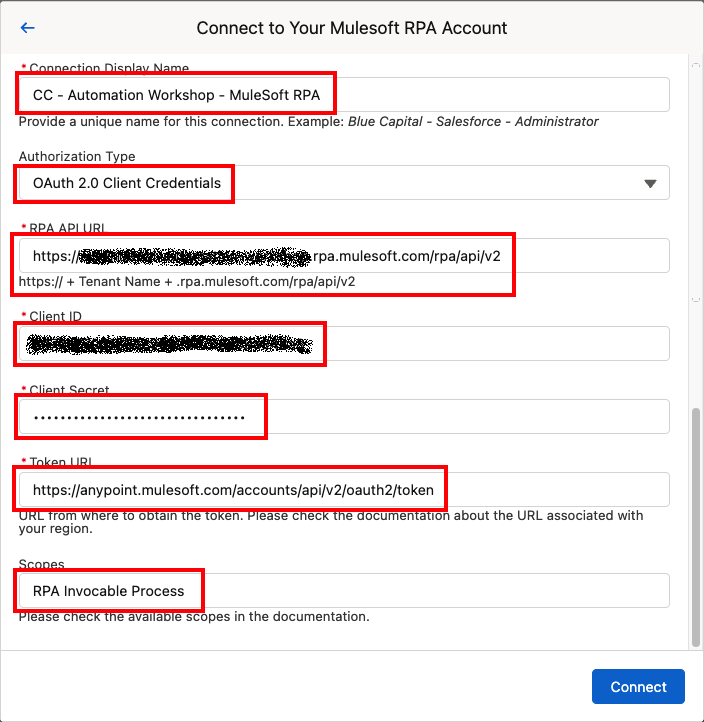
Click on
Connectto save and test the connection settings.
-
Configure the Invoke RPA Process Action as follows, making sure you select YOUR deployed process (pay attention to the process name’s initials), and click the
Select Additional Fieldsbutton. Make sure you select your RPA Process that you deployed to Production stage in the previous lab:
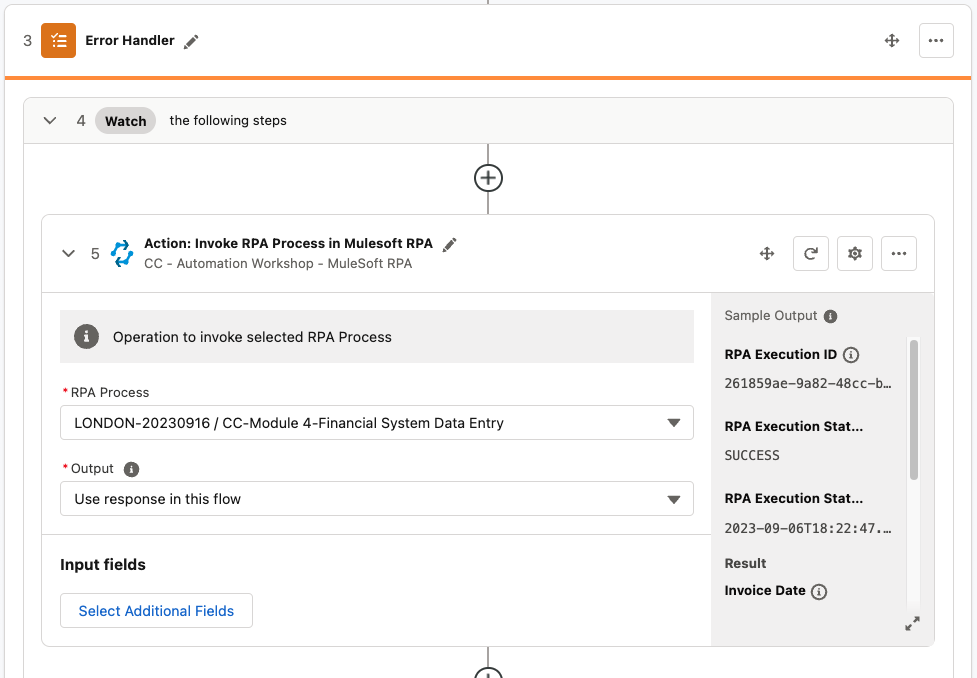
+ . Select the following fields and click Apply:
+
InvoiceDate

InvoiceDueDate

InvoiceNumber

InvoicePurchaseOrder

InvoiceTotal
+ image::module4_lab04_rpa_invoke_fields.png[width="700", align="center"]
+
. Map the fields as follows (all from the Invoice Summary event object):
+ image::module4_lab04_rpa_invoke_mapping.png[width="600", align="center"]
+ . Finally, should the execution of the Automation Process ends successfully, we need to update the variable created previously.
+
Just after the MuleSoft RPA step, click the plus button to add a Variable step.
. Set the Action to Update Variable, select the Automation Process execution result variable and enter the text Automation process executed successfully by clicking the Custom Expression button:
+ image::module4_lab04_update_variable_to_ok.png[width="700", align="center"]
Step 6: Update Invoice Record in Salesforce
The previous steps, triggers the MuleSoft RPA Automation Process and awaits for the execution to finish.
Now, we want to update the Salesforce related Account object with the result of the Automation Process execution.
-
Click the plus icon to add a new step immediatly after the Error Handler step.
-
Select a
System Actionof type Salesforce and select your Salesforce connection -
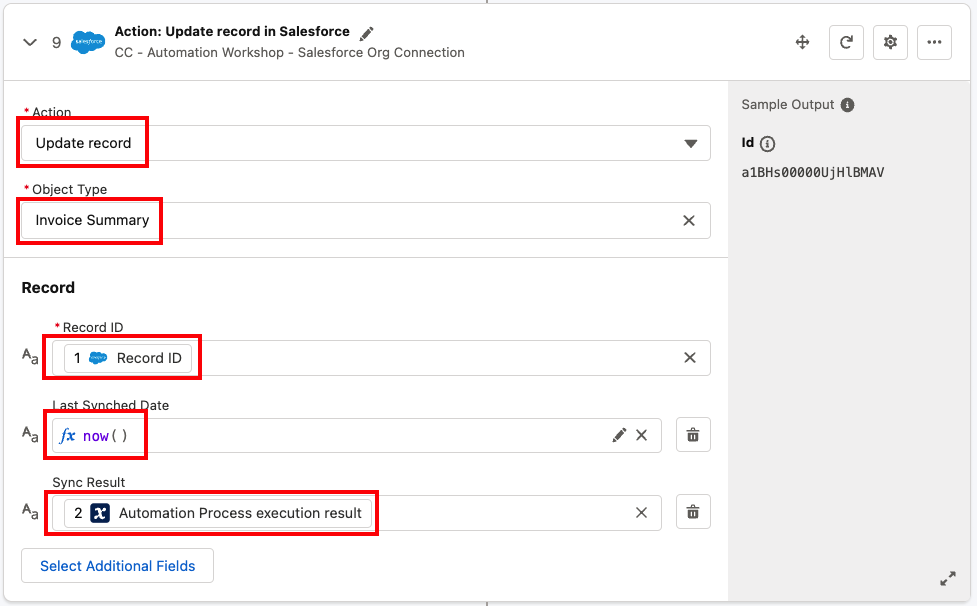
Configure the Salesforce Update Record action as follows and click the
Select Additional Fieldsbutton.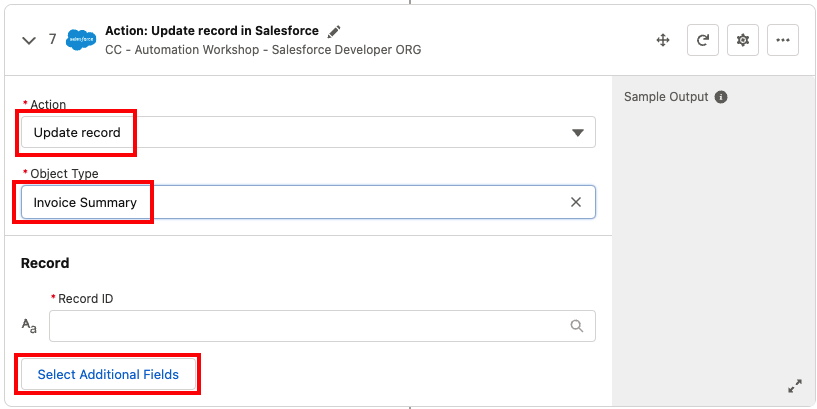
-
Select
Sync ResultandLast Synched Dateand clickApply: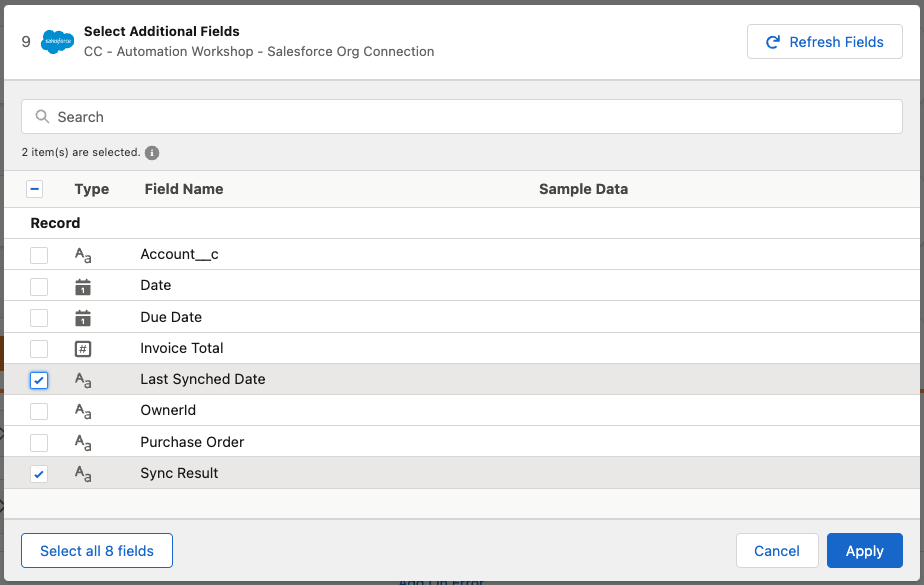
-
Map the
Record IDfield to the Triggering InvoiceRecord ID, theSync Resultto theAutomation Process execution resultvariable and for the Last Synched Date, click on the Custom Expression button, look for thenowfunction and click on it to add it to the function canvas. Click Apply to save and continue: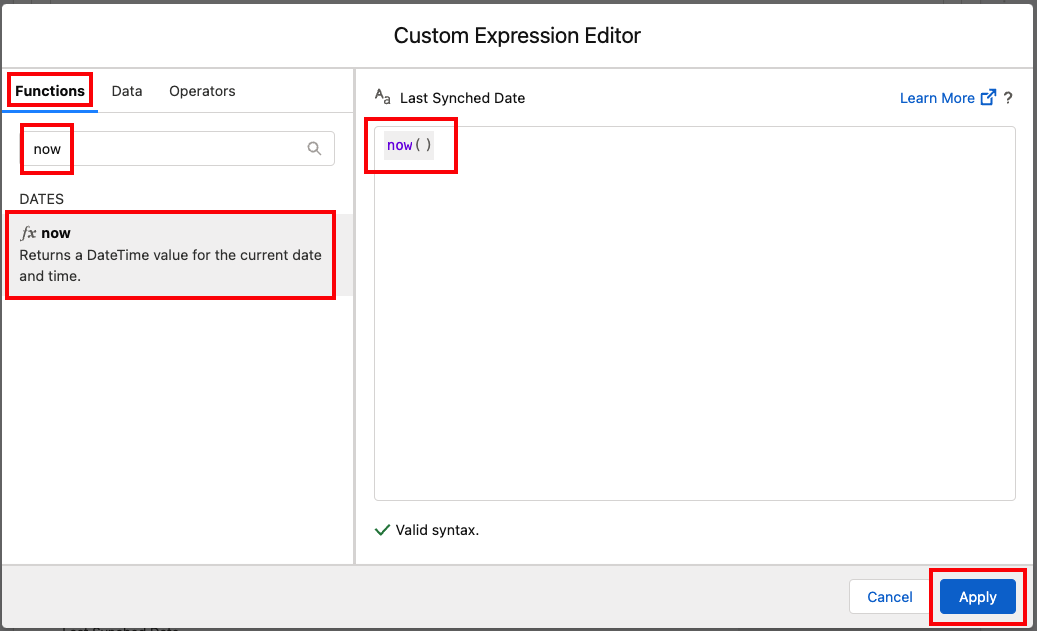
-
Save the composer flow by clicking the Save button on the top-right corner.
Please proceed to Lab 5 - Test the Composer Flow