Lab 1: Implementation - Automate Data Entry into Legacy App
Overview:
In this lab we will create the Automation Process that will enter automatically invoice date into the NTO legacy Financial System.
Step 1: Locate the workshop’s Process Category
-
Login to the RPA Manager instance and use your credentials.
-
Expand the
Process Automationmenu and click onProcess Management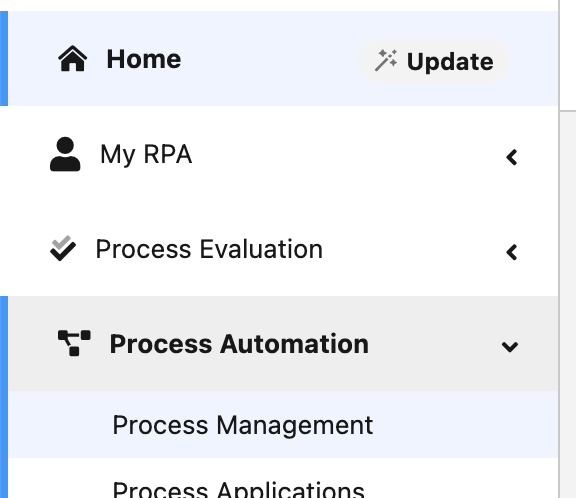
-
There should be one Category named as per this pattern
YOURWORKSHOPCITY-YYYYMMDD: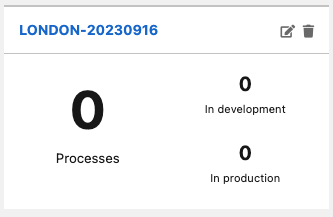
-
Click on this category to start building your Automation processes.
Step 2: Create the Process
-
Click on the
Createbutton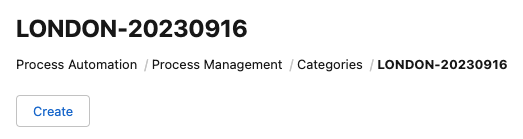
-
Use the following pattern for the process name:
<your name and surname/initials>-Module 1-Automate Data Entry into Legacy App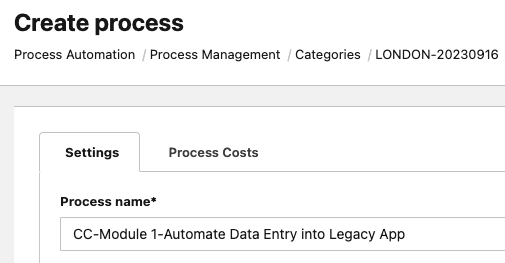
Scroll down and uncheck the
Use Process Boardoption (we will not use the Process Board capabilities on this workshop).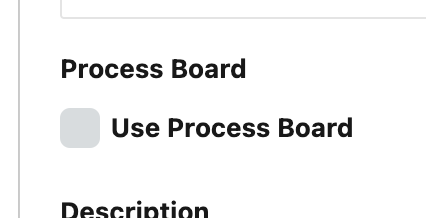
Click
Saveon the bottom right to create your new automation process.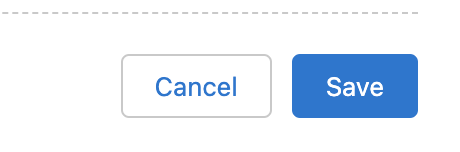
-
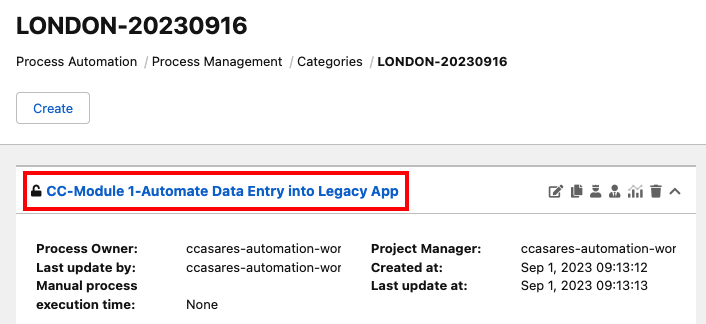
Open your new process by clicking on its name.
Step 3: Move Process to the Build Phase
-
We can move forward to the
Buildphase (for this lab we are skipping the design phase), by clicking on thePublishbutton:
-
Every time a process is moved forward to the next phase, a confirmation popup window is shown. Check the confirmation option and click the
Release to Buildbutton: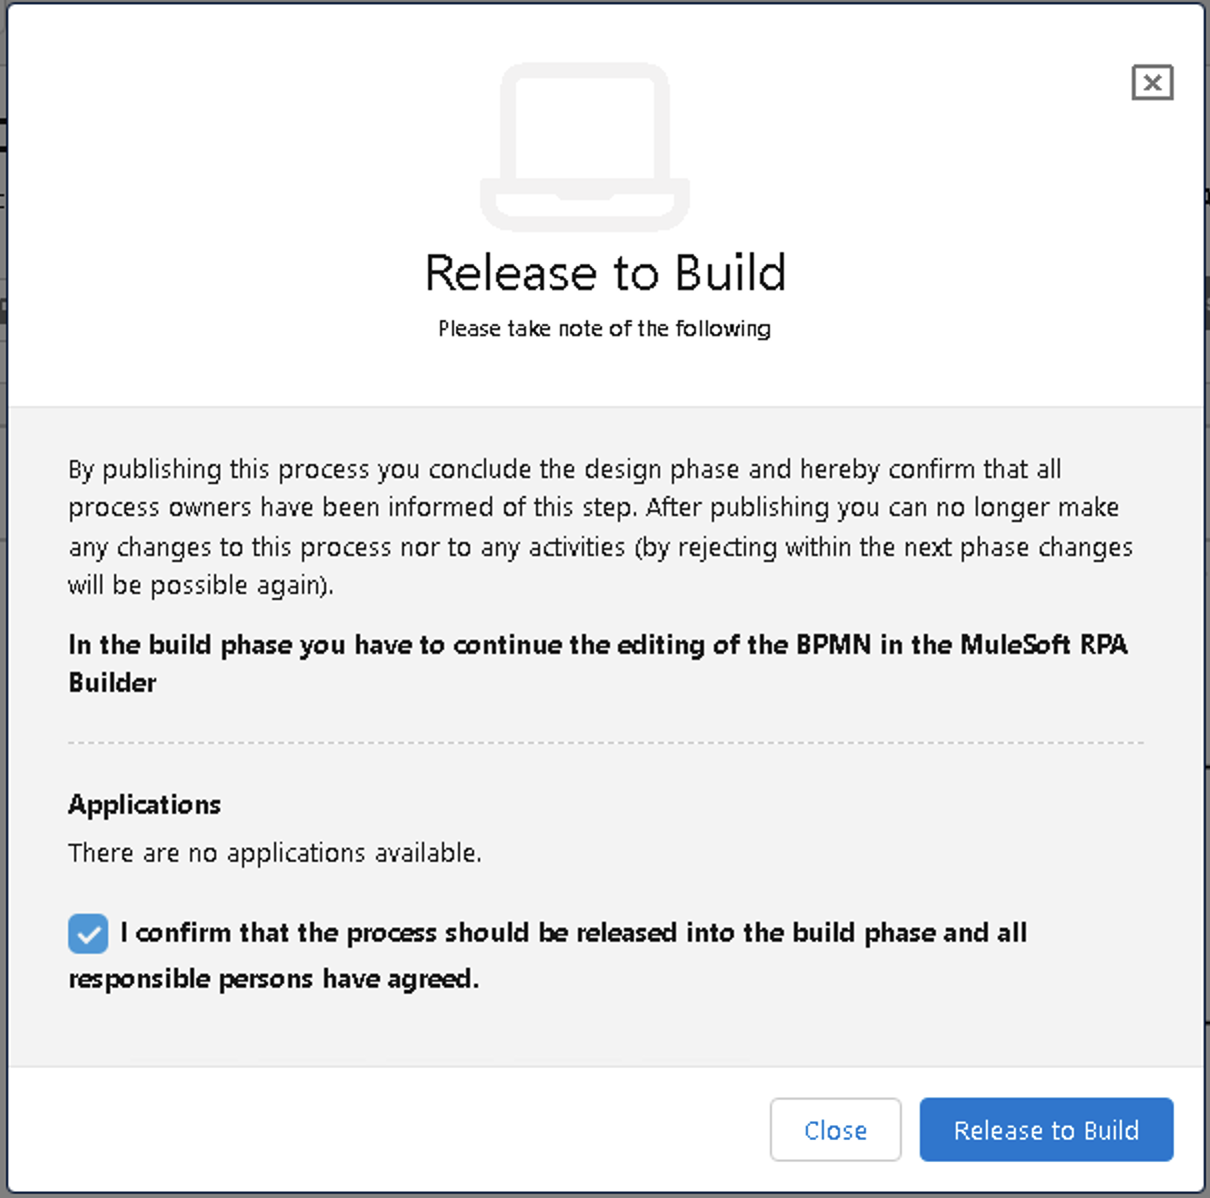
-
Now the process is in the
Buildphase and ready to be implemented with the MuleSoft RPA Builder tool
Step 4: Connect to Windows EC2 Instance
-
Using your RDP client software, connect to your Windows Virtual Machine (VM) instance. Make sure you use the address and credentials provided for you by the instructor.
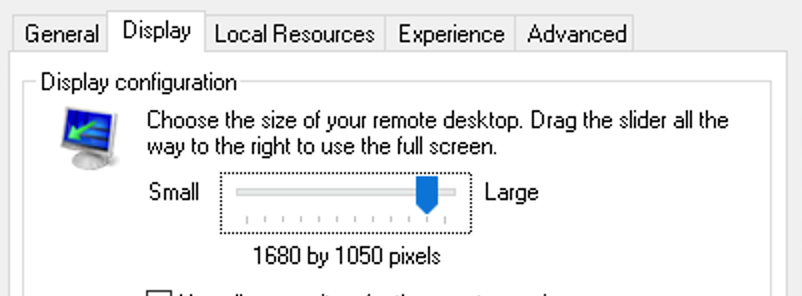
We recommend using
1680x1050for the connection resolution. If you would like to use a higher resolution you can try, but be sure to keep the same resolution at all times.
-
The Windows VM image provided contains all necessary tools to run this workshop. In this lab, we will use MuleSoft RPA Builder to model and implement the Module 1 automation process.
Step 5: Configure RPA Builder and Import the Process
-
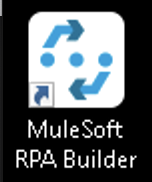
Locate the MuleSoft RPA Builder shortcut icon on the desktop and double click on it
-
The first time you open the RPA Builder, you will be prompted to enter your MuleSoft RPA Manager address and credentials. You should be given these by the instructor.
Enter the
RPA Manager Address(no need to type thehttps://prefix) and clickContinue: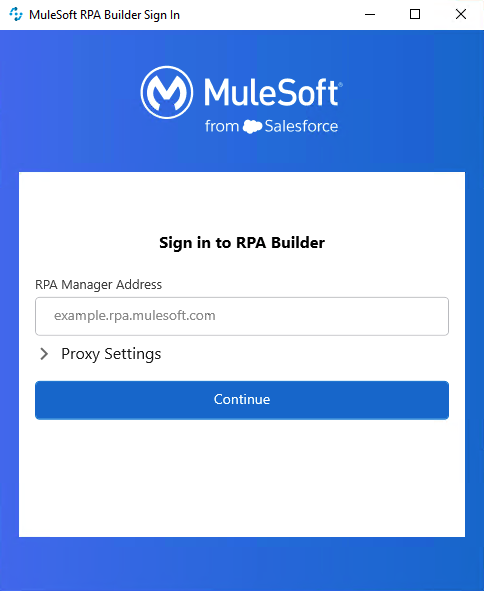
Then your
User Nameand yourPasswordand clickSign In:
-
Once RPA Builder is opened, click on the
Repository Explorertab. In the explorer tab you should see a number of processes that are currently inBuildphase. Locate your process and double click to open it.
If the
Repository Explorertab is not displayed, you can enable it by going to theViewmenu and clicking onShow Repository Explorer: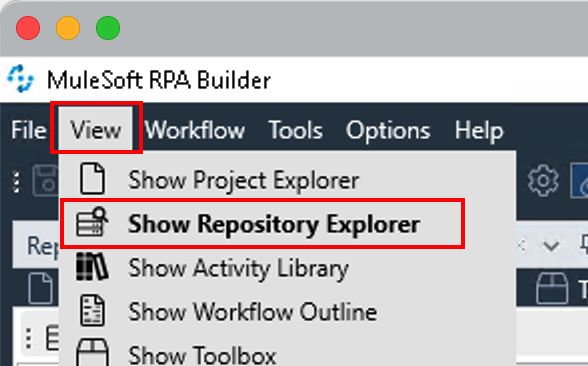
-
After double-clicking your process, it will be downloaded from the server and stored locally in your Windows VM. Any changes you make will be local. Later we will see how you can upload your changes to the RPA Manager server.
-
From the Windows VM, download the
Module_1_Lab_1_start.crpafile, that represents the starting point for the current lab.You should have the Google Drive link sent to you along with the credentials and other workshop material. This drive contains the solution for all Labs. If you do not have access, ask the instructor.
-
Once opened, click the
Import Projectoption under theFilemenu: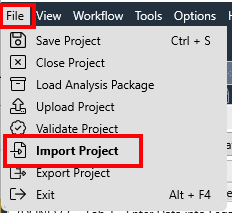
-
Click
Yesin the confirmation dialog, locate your just downloaded.crpafile and clickOpento import it.
Step 6: Configure the Imported Process
-
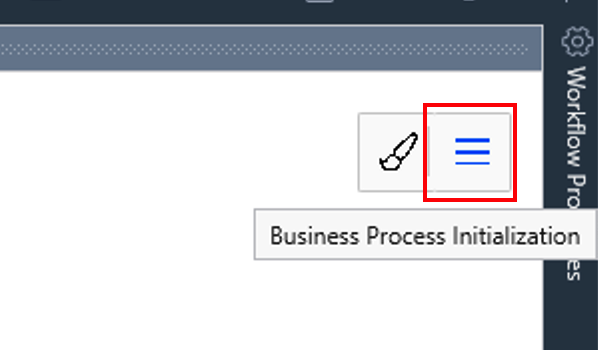
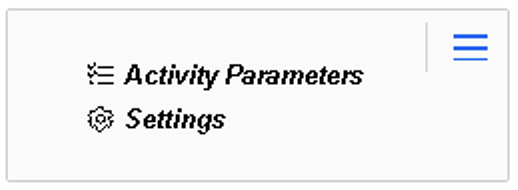
Locate and click the Business Process Initialization button at the top right of the Canvas and click on the Activity Parameters link:
-
Update the systemLogin and mail settings with values provided by the instructor. Only the systemLogin password and mailCredentials password should be missing.

-
Double-click on the existing
Check Emailactivity and its configuration window will be opened below: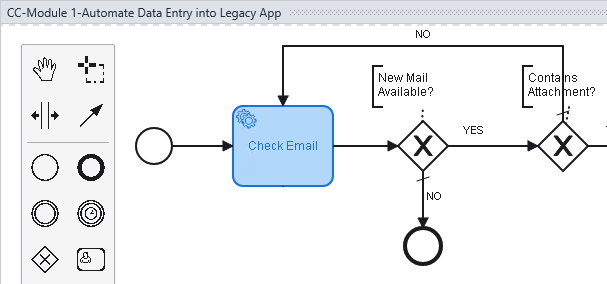
-
Double-click on the Read Email element.
-
Update (replace CC with yours initials) the subject email filter with this pattern
<your initials>-.
Step 7: Set up the basics
-
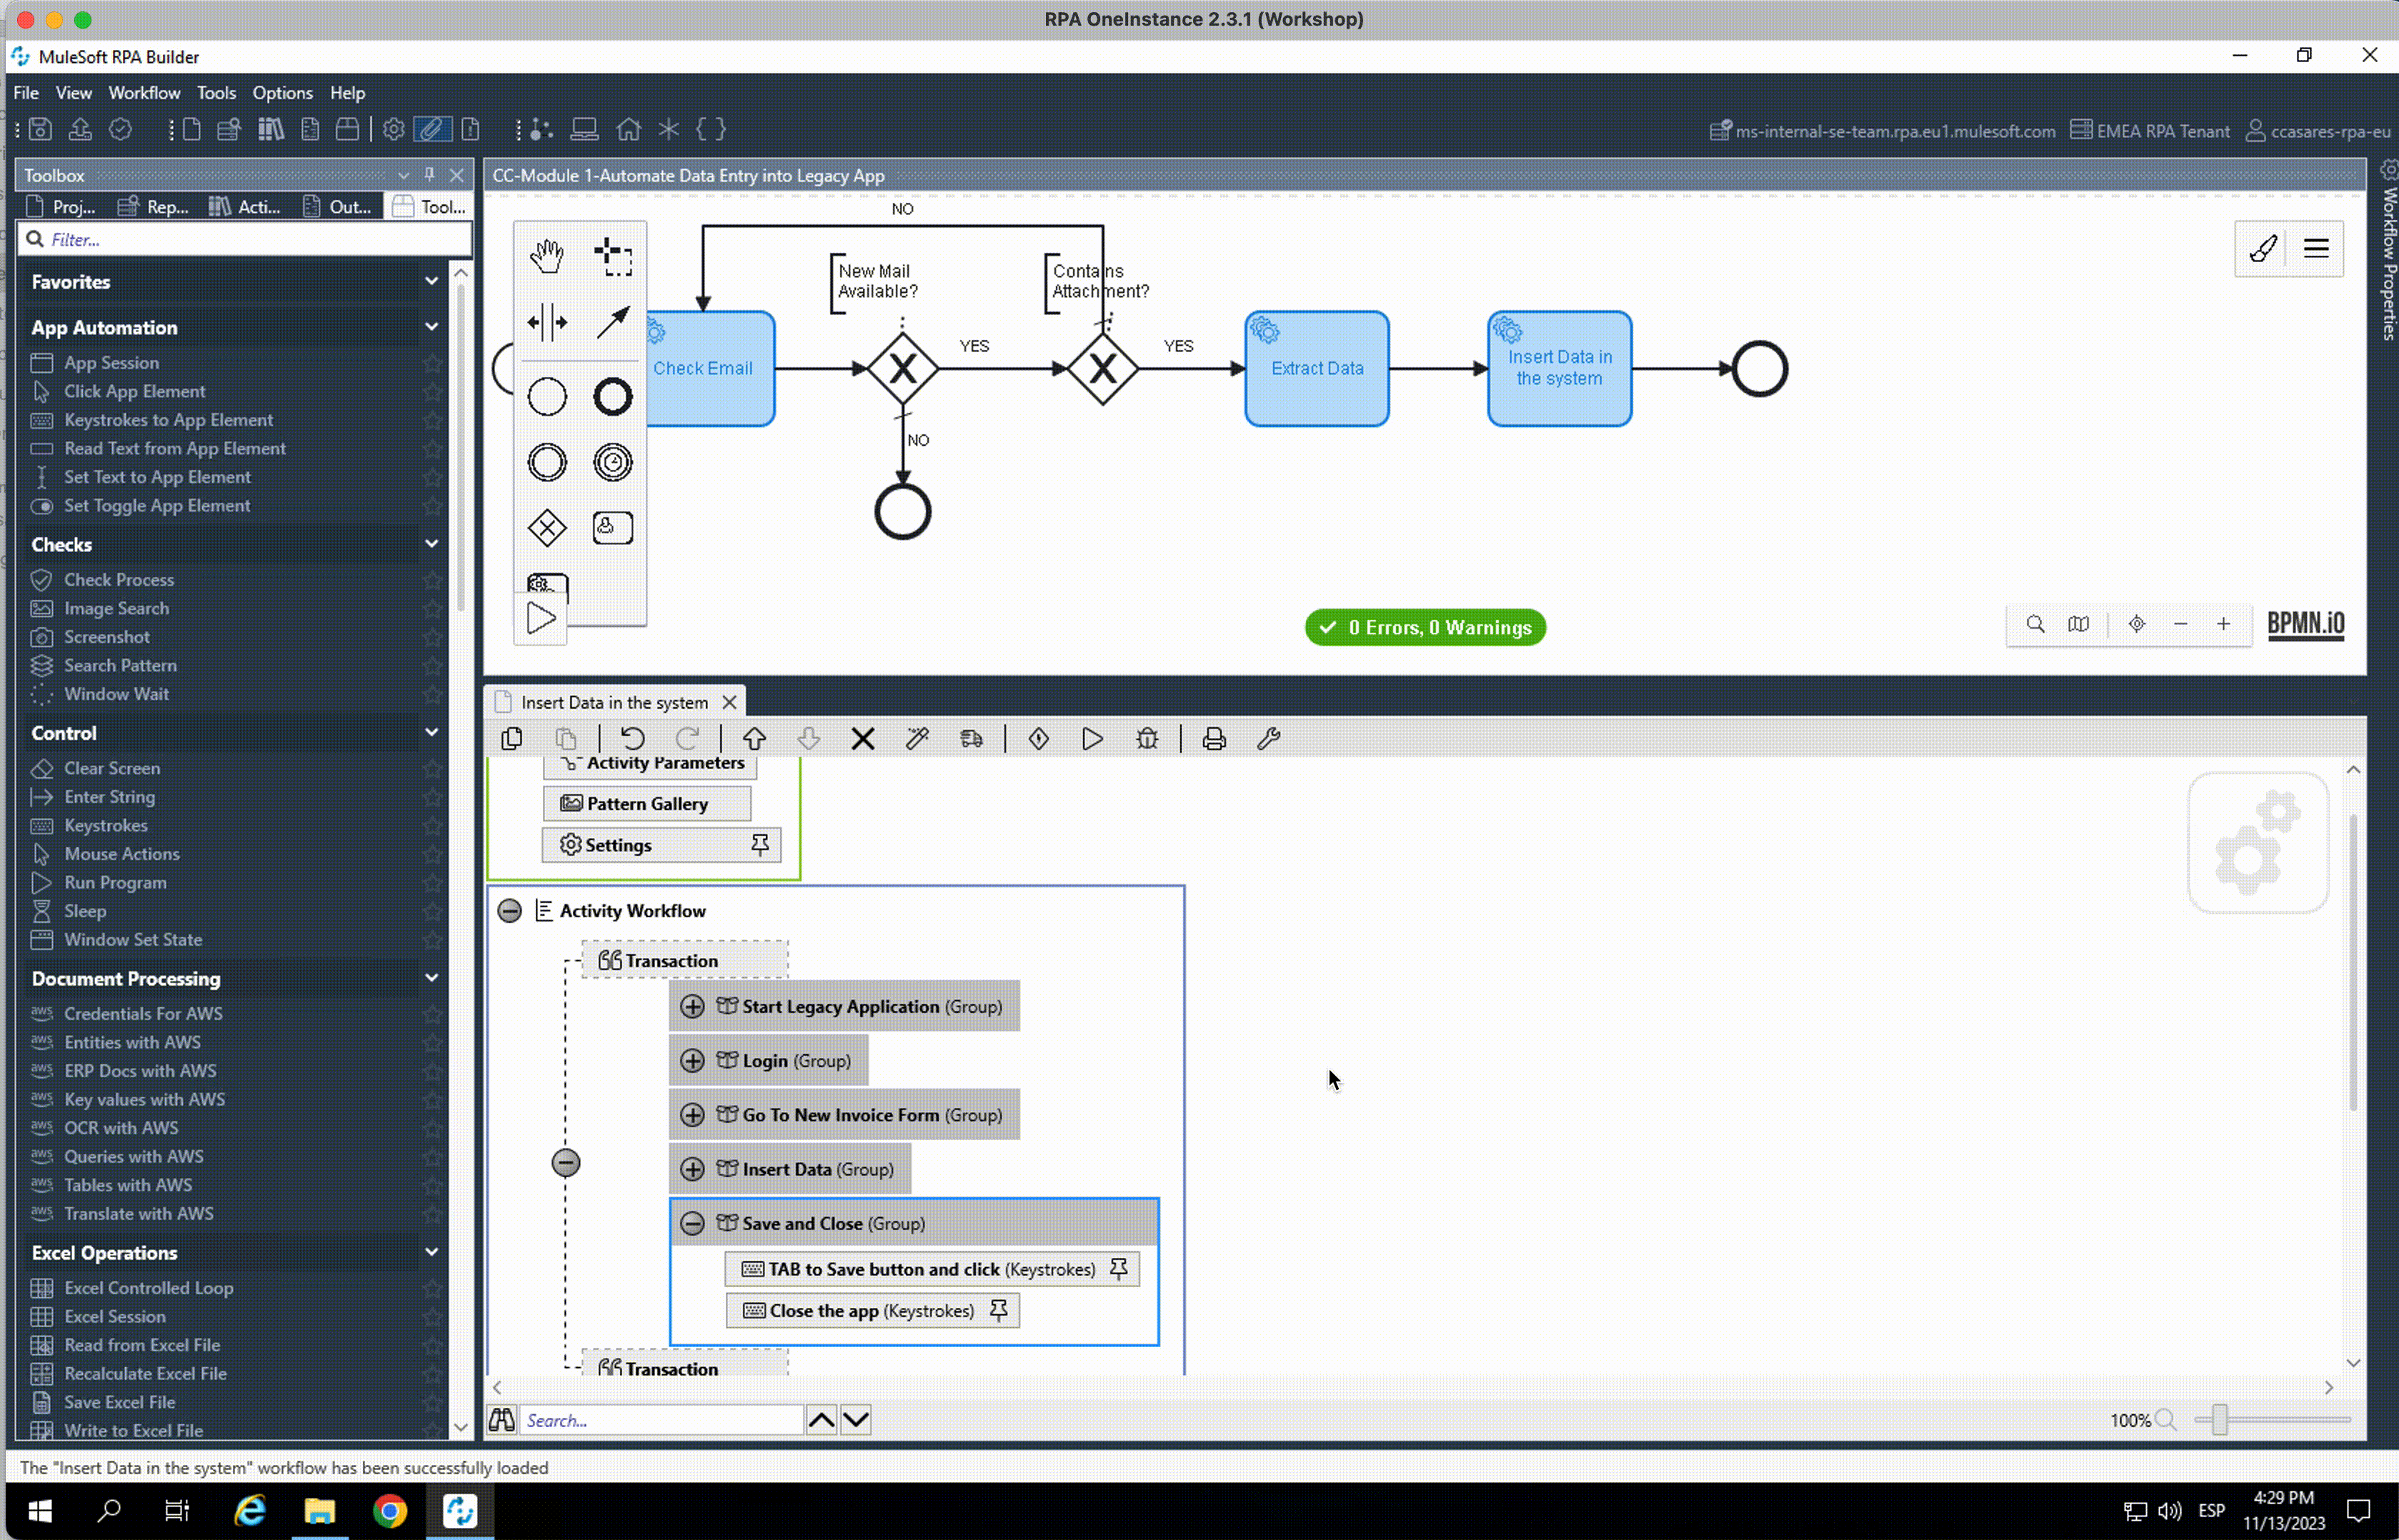
Open the
Insert Data in the systemexisting activity. Configure all the Activity Parameters that will be used: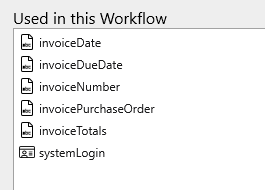
-
Drag and drop three
Groupsteps and name them as follows:Start Legacy Application
Login
Go To New Invoice Form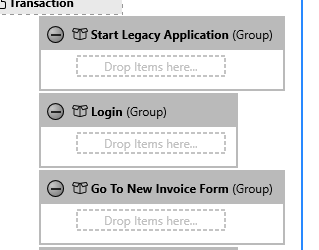
Step 8: Start the Legacy Application
We will be working on the Start Legacy Application group.
-
Drag and drop a
Run Programstep and open its wizard. -
Name it as
Open Legacy Applicationand click on theSelect File pathdropdown menu option on theFile namefield: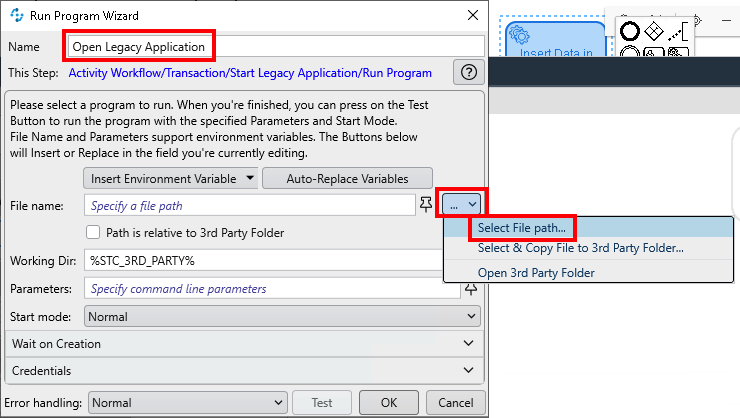
Navigate to the
Desktop\LegacyApps\Javafolder and select thestart.batfile.Expand the Insert Environment Variable dropdown list and select the
%USERPROFILE%one. It will be added at the beginning of the just populatedFile namepath. Remove theC:\Users\workshopentry to leave the path as follows:%USERPROFILE%\Desktop\LegacyApps\Java\start.bat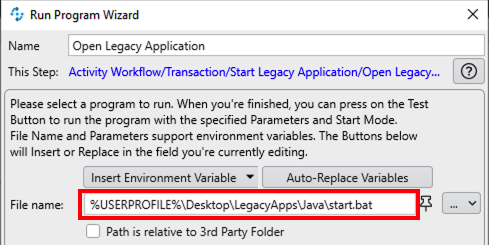
-
Set the
Start modetoMinimized. Expand theWait on Creationsection, check theWait for window to appearoption and set theWindow Titleexactly toNTO Login: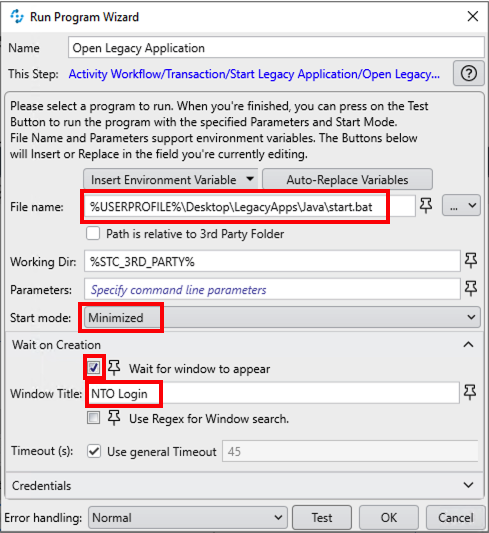
Click
OKto save and close. -
Let’s test everything works as expected. Click the activity’s
Runbutton and see what happens: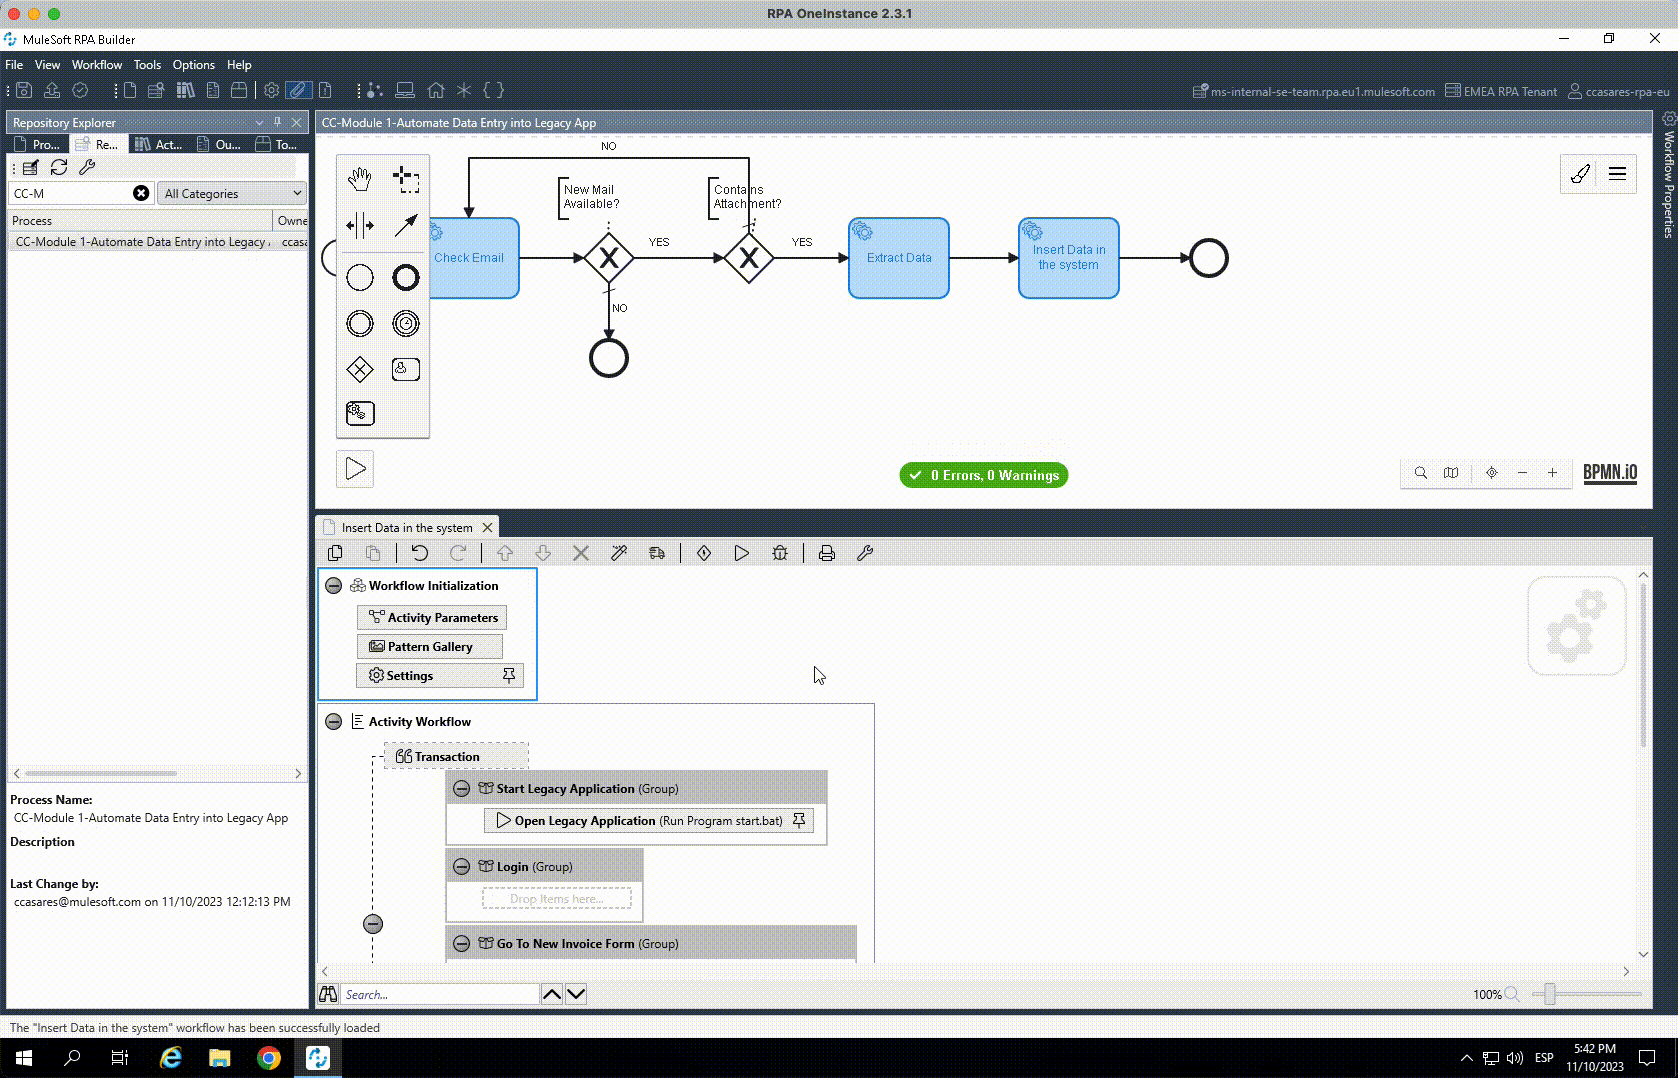
The Legacy App is opened and once the login window (with title
NTO Login) is displayed, the execution finishes andRPA Builderis restored to the foreground.
Step 9: Login
We will be working on the Login group.
-
For the login we will use the
systemLoginactivity parameter which is of typeuser account.user accounttype contains user credentials and are always encrypted at rest. The only way to use the underlying data (username and password) in an activity is by first decrypting them at runtime.Drag and drop a
User Account Decrypter, name it assystemLoginand select theActivity Parameters.systemLoginvariable for theUser account: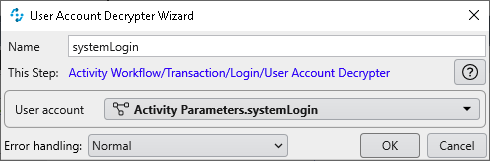
Click
OKto save and close. -
Bring the Login window to the foreground.
You can notice that the
Usernameinput box is already focused (a blinking cursor is on it). We could inject the credentials right away, but we’re going to ignore that and pretend the focus is not yet there. Why?, to show you how you can make sure to set the focus on the field of your election for future use cases.Drag and drop an
Image Searchstep and open it. Name it asSearch for Username.Click the
Start from scratchbutton to capture your pattern image.Move and resize the capture window to select the
Usernamelabel as follows: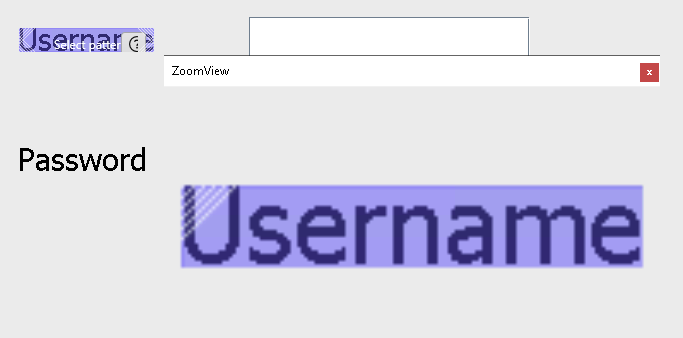
Press
F10to validate the capture window.Click the
Full Screenbutton andCaptureto confirm the selection. -
Back in the wizard, select the
Contour Plusalgorithm, check theWait until image is steadyoption and clickOKto save and close: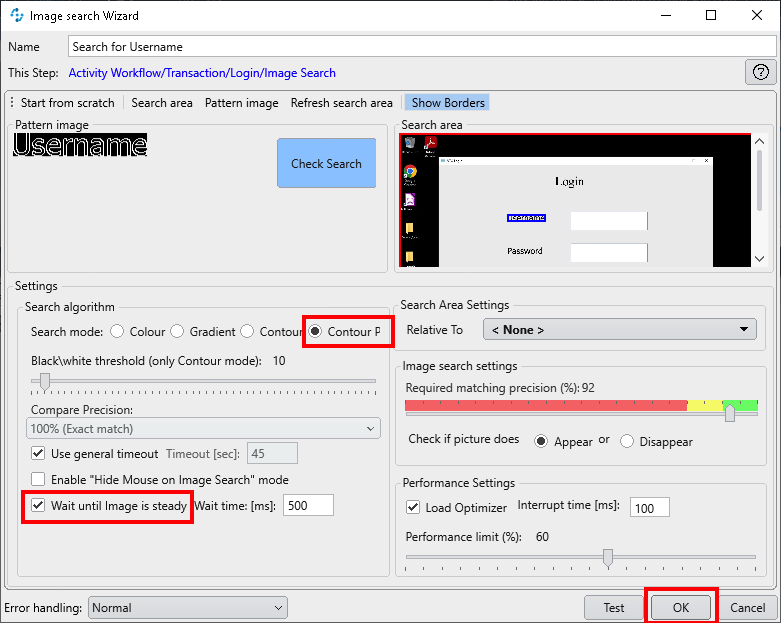
-
Now that we locate the
Usernamelabel in the application, we want to left-click on the input box that is located slightly on its right, to set the focus on it.To do so, drag and drop a
Mouse Actionsstep and open it. Name it asClick on Username input box.Notice how the
Relative Tosetting is automatically set to the X/Y coordinates of the previous Image Search. This means that any click captured will always be based on such coordinates.Click on the
Startbutton to capture the mouse actions: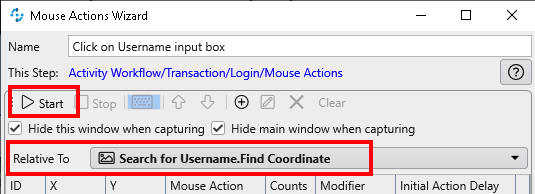
When the Login window appears, simply left-click anywhere on the Username input box as follows:
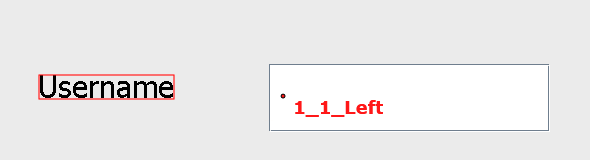
Press
F10to end the capture. The mouse event will have been saved. ClickOKto save and close. -
We’re now ready to inject the username and password and perform the login.
Drag and drop a
Keystrokesstep and name it asPerform Login. The Keystrokes activity allows you to simulate keyboard entries.In the wizard window, click on the
+button to enter a number of keystrokes as follows: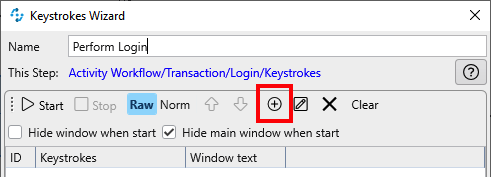
Keystroke type Value Script VariablesystemLogin.UsernameSpecial CharacterTABScript VariablesystemLogin.PasswordSpecial CharacterTABSpecial CharacterSPACE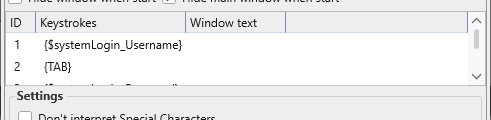
Click
OKto save and close. -
Let’s test what we have done so far.
First close the Legacy Application.
Then, click the
Runbutton and see what happens:
Login is performed,
RPA Builderis restored in the foreground and you can see how the main application window is then loaded. We will be doing the rest of the operations on such main window, but it takes some time to get loaded. We do need to wait until it gets loaded before entering the invoice data! -
Going back to
RPA Builderdrag and drop aWindow Waitstep still in theLogingroup.Name it as
Wait for main Window.As the legacy application main window is already loaded as we did the previous test, we can click on the
Collect window titlesto get all the current window titles in our Windows box. Once clicked, you can open theWindow titledropdown list and locate theNTO Financial Module (normal)one.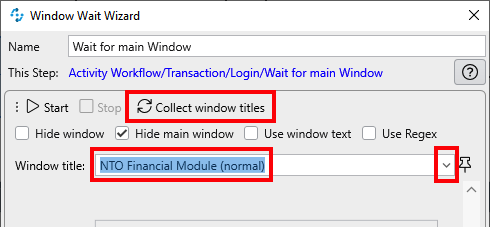
Leave the rest of the settings as default and click
OKto save and close.If you do a new test (remember to first close the existing instance of the app), you will see how
RPA Builderis not restored to the foreground until the main window is displayed and detected by this lastWindow Waitstep. -
The
Logingroup is now fully completed and this is how it should look like: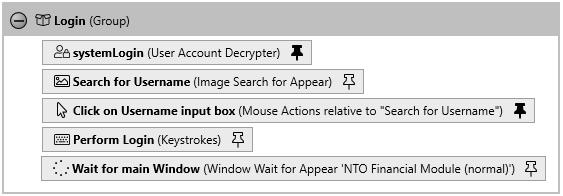
Step 10: Go to New Invoice Form
We will be working on the Go to New Invoice Form group.
-
This one is easy. To move from the current tab to the New Invoice one, we just need to press
ALT-3and an additional TAB to set the focus to the first input field.Do so using a single
Keystrokesstep. Dreag and drop one, name it asMove to New Invoice Form and set focusand add anALTDOWN,3andALTUPkeystokes followed by aTAB: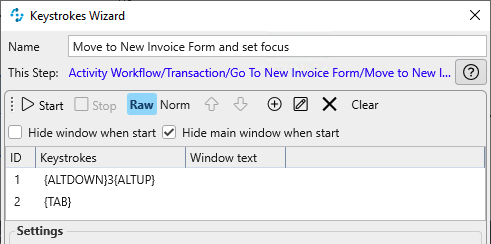
-
Close the legacy app first and then click on
Runonce again to see everything works as expected. Notice how the cursor is moved to the first input field at the very end.
Step 11: Insert Data
-
Now that we have the focus on the first input field (Invoice Number), we can proceed to enter the data.
Drag and drop a new Group and name it as
Insert Data.
Within a single Keystokes step, you will be adding all data and moving the focus between all the input boxes. Again, all in a single step.
-
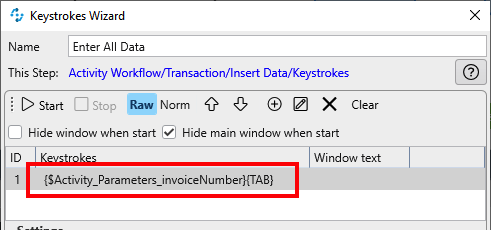
Drag & drop a Keystrokes step inside. Name it as
Enter All Data.Double-click on it to open the wizard window. Click on the
+button to start adding data/keystrokes:
First, you need to enter the Invoice Number data.
In the Keystrokes Editor expand the Insert Script Variable dropdown list and locate and select the
Activity Parameters.invoiceNumbervariable.Expand the Insert Special Character dropdown list and locate and select the
TABentry.This is how it should look like so far:
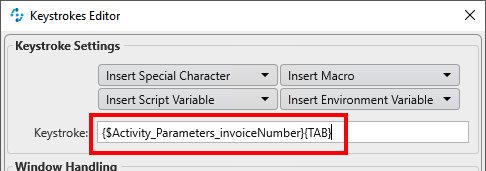
Click OK to finalise. See how the invoiceNumber variable and TAB keystroke looks like:
-
Repeat the previous operations to add the following:
${Activity Parameters.invoiceDate}{TAB}${Activity Parameters.invoiceDueDate}{TAB}${Activity Parameters.invoicePurchaseOrder}{TAB}${Activity Parameters.invoiceTotals}(no{TAB}is needed here)
Step 12: Save and Close
We have entered all data however we haven’t saved it yet!
-
Drag and Drop a new Group and name it as
Save and Close. -
Add a Keystrokes step and name it as
TAB to Save button and click.Add the following keystrokes one after the other:
TAB,SPACEandSPACE(this last one to close the informative dialog box)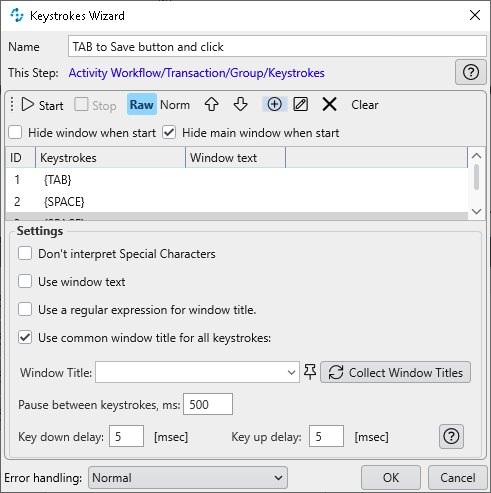
-
Finally, we need to close the Legacy application.
There are many ways to close an application: use keyboard shortcut, mouse clicking, ask window to close or kill the app… all these can be done with MuleSoft RPA. On this case, we’ll use the
ALT-F4keyboard shortcut.Drag and drop a new Keystrokes step and name it as
Close the app.Add an
ALTDOWN,F4andALTUPkeystokes: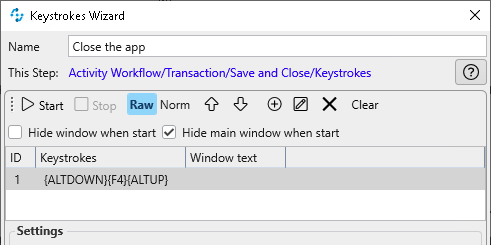
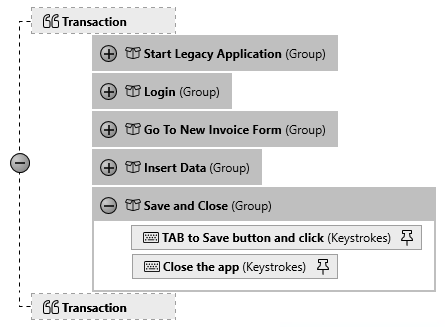
This is how the activity should look like now:
-
If you want run a last test on the Activity and see how everything is working, including the application closure: